Pages

Showing posts with label fiber sculpture. Show all posts

Sunday, July 21

Animation and softies roundup!

I said earlier that working felt good. I'm lucky to have a job I love, and no matter what's going on in life or in the world it's hard to stay sad or mad when being creative with kids. I had morning and afternoon workshops at Fleisher summer camp last week, and both classes were TOTALLY full! This is the 3rd or 4th summer I've taught "Critter Softies" but never to such a large group before. Sixteen kids ages 7-10 came out and learned how to sew and construct stuffed toys.
As usual, we started off with a simple 2 sided felt animal so they could learn the basics of sewing. It's important they learn how to thread a needle, start and stop a thread, and do whipstitch, as they need to use the skill for closing up the opening on a machine-sewn softie too. 
 
We did  story and character brainstorm to come up with ideas for a hand-colored softie. I have the kids draw and color with fabric marker on plain muslin, and then do either a colored front and back or a colored front with fabric back. There were lots of Happy Feet penguins, a Totoro, and several  Loraxes. Kids who had time also made a friend for their character so that they could do imaginative play.
 These stuffies are sewn on the machine, but some kids added on handsewn limbs. I love seeing kids 2D drawings turn into 3D stuffies they can play with!
 With the kids ranging in age from 7-10 there's a huge difference in motor skills and craftsmanship. The rabbit sleeping on the moon below was AMAZING! She appliqued the silky white bunny over the muslin moon on both sides, stuffing under the applique before closing it up. I was really careful on the machine for her, and it came out perfectly!
The last project was a build-a monster. We did a roll-the-dice game inspired by the cartooning game "Pick and Draw".  I didn't have a deck, so I drew out 6 options for body, head, arms/legs, and facial features, and gave the kids a dice to roll to select their part. I wanted the kids to get the idea of how the pieces would fit together in sewing as well as get some inspiration. In the past I would have the kids draw their design, and then I would draw out the patterns they needed, or have them draw them. Unfortunately, it's REALLY hard to get them to understand the need for a certain scale when sewing, and they always draw things too small or skinny. So for the first time ever I came up with some simple templates that gave them construction options, and showed them how they could mix and match to make a creature of their own design. It was a good happy medium between my need for scale and consistency, and my desire to let them have choice and creative expression.. For the monsters I let them use any fabrics they want from a big bin- mostly rescued upholstery samples from the design center interior design showroom (I still have 3 huge bins full from when I worked at one 5 years ago!!!) So the creatures have very interesting patterns and textures.
We ended up making over 60 stuffies together over the course of the week. They went home with full arms and happy faces. 
I hope this video uploaded okay. My mornings were spent with fifteen 11-13 year olds for an animation workshop. This was the very first time I've taught the workshop and taught in our digital lab, so I had a bit of a learning curve. We started off with making flipbooks from videos of the kids in the courtyard. We watched a bunch of stop motion animations and learned the history and process of stop motion animation. Then the kids spent an entire morning working in teams to make the animations in the video above. Finally, I met with each team for editing while the kids worked on some photoshop drawing animations:
I was really pleased with how well the students worked together- one thing that helped was a worksheet I had them complete to plan out their storyline, shooting location, and supplies needed. The content was totally up to them. Some groups were very invested in telling a story while others explored movement of figures and materials. On the last day we invited parents for a viewing party, and we had a great turnout.

I'm very thankful I had these creative kids to work with this past week. Art is life-giving.

Sunday, April 7

Unusual threads

It was First Friday! It was Spring! There was finally art worth seeing and weather worth going out in to see it! Unfortunately I forgot my camera. But there were two great sights in Fishtown on Friday night. Firstly, Holiday Campanella showed off her felted "Fleisher" at Philadelphia Sculpture Gym, capturing two of my loves (fibers and my favorite community art center). Secondly, Jason Hackenwerth had an installation/environment at 2424 York that was magical. With light plastic sheeting, clear packing tape, and fans, he created a series of tunnels, domes, and cave-like spaces to move through. The air pressure as the doors to the space opened and closed would dramatically alter the inflation and movement of the plastic structures. It reminded me of the rare occasions the gym teacher would let us play with the parachute and you could run underneath the puffed up cloth and be enclosed.

The next night brought a new adventure out to West Philly to Seeds Gallery to see a collaborative show including Genevieve Coutroubis, Johanna Marshall, and John Karpinski. Genevieve's photos of Greece were the playground for John and Johanna to explore. John's drawings captured the magic of childhood and Johanna's stitchery added nostalgia for the past. 
 I especially loved this scrollwork over the strap on the statue's shoulder:
Seeing these stitched photos makes me want to play some more with stitching on paper. Maybe if I printed out some of the panoramas I've been doing lately. Fabric is more fun to stitch on though. Maybe I could do some digital prints on cotton or silk..... Seeing art makes my mind spin.

I figured out that in my hour and a half in the studio today I was able to stitch about 60 stitches a row, each row was about 2 feet... there were 12 rows making my total for the day about 24 feet of thread and about 720 stitches. I'm hoping for more time tomorrow so I can get a section of my wall piece totally finished.

Monday, March 25

Stations and time

Some projects take forever... some no time at all. Part of it is how long it takes to come up with an idea. The other part is how complicated the execution is. It's always easier when a exterior source poses your artistic challenge. This coming Friday, March 29th is GOOD FRIDAY, and I was invited to participate once again in the artistic interpretation of the Stations of the Cross in Norris Square Park at 3pm sponsored by West Kensington Ministries. It's a great ecumenical community event with participants of all ages and artistic experience, but each interpretation is heartfelt and meaningful.
 I am doing Station 4 this year- "He Meets his Mother". I was thinking about Mary's desire to offer help but feeling helpless in the face of her son's persecution. To know from the very beginning what his fate would be. I cast in plaster an upturned hand- a gesture of both offering and asking for help, as well as one of prayer. (My daughter played hand model for me- how has she grown so much that her hand is as big as mine?) In the palm is a strip of cloth printed with the stories of Mary and Jesus' interactions throughout his life- a lifeline if you will. Here it is in the studio:
Next to it is my newly finished "Deborah's window", which was 2 years in the making due to fits and starts, compared to the 2 week timeline of the Good Friday piece. They are both mournful pieces. My work feels mournful lately- even the wintry tree piece. You'd think I'd lost a lot of people in my life to see all this work.

Anyway- I'll be in Norris Square, corner of Hancock and Susquehanna on Friday, March 29, 2013 at 3 pm walking the way. Come join us for an interesting afternoon of art, song, story, and prayer.

Sunday, September 9

I'll huff and I'll Puff

First Friday along the Frankford Arts Corridor is really hopping lately. It's in no small part to the new addition of the Philadelphia Sculpture Gym at Berks and Frankford Aves. This month they've invited Terri Aluise, a fresh graduate from PAFA to exhibit her fairy-tale-inspired mixed media sculptures. I'm a sucker for anything fiber arts, and I think Aluise creates quite successful juxtapositions between hard and soft sculptural materials.
 While I enjoyed the materiality of the objects in the exhibition, what really made me fall in love with it was Aluise's sense of humor and spin on familiar fairy tale stories. The big bad wolf  is skinned and laid out like a bear-skin rug. The 3 little pigs sit contentedly on her piles of building materials.
 The 3 bears sleep soundly on their just-right bed no longer disturbed by naughty girls (a mat of golden braids graces the floor at the foot of the bed).
 And the ugly duckling has blossomed into a rainbow of a swan, leaving the other ducklings puny and drab.
I enjoy the nostalgia of stories from childhood. It's remarkable how a single object can draw up a whole narrative in one's memory. I've always hated to finish a book, because I want to know what happens after "The End". Aluise gives a very satisfying extension to these favorite tales. For more on Terri Aluise visit an article about her show, and her website (with way better pictures than I snapped here).
I can't wait to see what shows up next at PSG!

Saturday, July 14

Life goes on, and monsters are made.

I'm back in the classroom again- this time for summer camp and a residency at Fleisher, doing what I'm supposed to be doing. I was worried at first- I had a full roster of 15 kids for my softies class. The most I've ever had for it before was about 8, and it's always a challenge getting things finished by the end  of the week. However, only 12 showed up, and they were 12 incredibly focused and talented 8-10 year olds. I also had the luxury of an awesome assistant and a teen intern, so I didn't have to be helping all 12 at the same time! We managed to get lots of creatures finished. We started with handsewn felt pillow/pincushions with appliqued initials so the kids could practice stitching. Then they made simple 2-sided animals, also handsewn. Finally we made some monsters with separately sewn and stuffed limbs and handsewn embellishments. Here they are:
 Usually I have the kids draw what they'd like to create and then consult with me to draw out the pattern pieces they'll need. Then the kids cut everything out, trace their patterns, and bring me a stack of all their pieces ready to sew. I sew, clip, and flip the pieces and the kids stuff the limbs. They handsew on their eyes and details, and then bring everything back to sew into the body. Finally they stuff and handsew the closure.
 We had a donation of upholstery samples given to us recently, so the kids found some interesting textures and patterns for their creatures. But some kids stuck with felt. I like how easy it is to sew felt, but I hate how the stuffing always pokes out and gets fuzzy...
 Three of the kids had taken my softies class after school in the winter, and it was so great to see how their sewing skills had improved. They have amazing imaginations!
 Here's a menagerie of monsters:
I love seeing their drawings turn into real toys. I could do this all the time. However, next week I'll be doing a mystery painting with the 11-13 year olds instead.

Saturday, July 7

Monster softie!

While other people were having parades and barbecues on the 4th, I stayed up in my cool, air-conditioned room with my daughter getting crafty. I'm teaching a softie-making class next week at Fleisher and wanted some new exemplars. It's very handy having a creative child when you're an art teacher. I borrow her imagination all the time (and test run projects with my 1-person focus group). It really helps me think out what I'll do in the classroom and understand what my kids might have trouble with. Unfortunately, she keeps growing and getting older, and she's already surpassed the age of most of the kids I teach regularly.
But anyway, we had a lot of fun transforming her monster sketch into a real softie. I marked out some pattern pieces based on her drawing. She picked out fabrics for all her parts and cut out the pieces. She then did all the handsewing on the felt eyes, ears, and mouth. (Whoot! my kid knows how to do running stitch, backstitch, and straight stitch and I didn't even have to remind her how!! When did that happen? Oh yeah- she's stitched for me before...) I pieced everything on the machine and handed off all those tentacles for her to flip and stuff. She did the final blindstitch on the base. I realized too late that we forgot the eyebrows in her drawing, and instead of the claw hands she had at the sides, we moved 2 tentacles up. The head is also not as balloon-like as her drawing... but all in all it's a very nice interpretation, and she's very happy with it. It's quite a character!
Wish me luck next week- in the past I've only done this class with about 8 kids, but I've got a whopping 14 signed up for it this summer! I almost don't want to bring this particular monster in to show them as EVERYONE will want a creature with 8 tentacles to sew in. YIKES! Luckily I will have an assistant who knows how to work a machine, and I think we'll pull it off. Who knows, maybe I'll even snag a teen intern for help. It will be a very exciting week to say the least!!

Saturday, December 31

Ending on a good note

In this last week of 2011 I spent most of my daytime with my Winter Camp kids  at NLArts and most of my night time stitching away. The project I was most pleased with at Winter camp was our winter bird sculptures. The kids made a paper and tape armature and wrapped it in plaster gauze. They painted their sculptures (which would have turned out better if the sculptures had been dried overnight instead of  just for 2 hours or so), and arranged them in a flower pot/stick/rocks setting.
A cardinal in a nest of plastic leaf vines

a duck and pigeon

a graceful chickadee

Our city kids were most familiar with sparrows and pigeons, which are ever-present, but we also had an owl and even a squirrel on a branch (not a winter bird, but anyway).
 Today I brought the final addition to my organza piece over to Wendy Osterweil's studio. This is part of a collaborative wall of tree/skin textures she wanted as part of her Painted Bride exhibit in January and February. I spent a couple of hours on the final assembly and a few extra details, but here it is:

Adrift
 If time and organza supply had allowed this could have kept on growing indefinitely. It reminds me of driftwood. It reminded Wendy of a bird with swooping tailfeathers. I loved how substantial in scale yet delicate in presence it became. Working on this piece was very freeing- I let it happen and "listened" to the organza. I didn't worry so much about any raw edges or "mistakes". I let it grow as big as it had to be and didn't feel weighed down by the scale and pressure to make something large. The final dimensions are about 10 feet wide by about 4 feet high. I felt unconstrained by the rectangle or grid, and allowed it to take on organic perimeters as a somewhat sculptural piece. I can't wait to see the entire exhibit installed with my contribution included.
the beginnings
 The major work of this week was this little piece. It started with the square of pieced scraps from my gran. On Monday I finished up all the reverse applique windows of various dimensions.They are loosely based on a map of my neighborhood. Last night and tonight I worked till the wee hours filling the entire space with concentric rings of running stitch. Red lines spring from the top circle and fill to the edges and 2 smaller black rings expand from the left and right center. I think I might call it "repercussions". On Wednesday night there was a huge fight with a heavy police response on the corner of my block. I think it might have played a factor in the direction of this piece...
the endings- "Repercussions' (still needs binding)
It has been a tough but rewarding year. I survived student teaching and now am certified to be an art teacher. I completed my thesis and will soon receive my Master's degree diploma. My daughter now attends a middle school where she is flourishing and more herself than I remember her being at her old school. I exhibited work in a museum. I've had numerous opportunities to teach and work with children. Many, many prayers have been answered (with a YES for once!). In this last week of the year I can give great thanks for all the opportunities I've had, for friendships and family, for creativity and inspiration, for the generosity and kindness of others. Thanks for reading this year.

Thursday, November 17

Sculptural silk

Crispy silk chiffon has a life of its own. I didn't really impose the pleats, but danced with the fabric as it flowed under my needle and thread. They're just little pin tucks with running stitch, but they create such interesting ripples in the fabric.
 I left the green pretty much untouched. It has one pleat, but someone said it looked like a piece of sky among the bark. It had to stay that way.
 I wish I could take credit for the beautifully subtle color and texture on this silk, but they were dyed and printed by Wendy Osterweil. This sculptural silk is for her installation at the Painted Bride in January/February. She has invited several artist friends to collaborate on a wall of fiber "skin/bark" to be very tactile and touchable. I feel very honored to be part of this collaboration. I love stitching this silk. I love working so big, so quickly.The surface is not as labored as my work usually is. It's just enough. It's even better  knowing there will be a lot of it.
This piece is about 4 times bigger than the first piece I made. I didn't add any extra embroidery or any of the teabag paper  that the other one had. The color in this one has more variation and contrast and didn't seem like it needed anything extra.

It was so nice to have this quick piece to work on. This week has been stressful- thesis deadlines draw ever closer. I have spent hours and hours writing, but I need to stitch too so I can get out of my head and relax.

Sunday, August 21

Softie roundup!

For the past 6 weeks I've been teaching a softies class at Fleisher for adults. Here's a glimpse of some of the creations my students came up with. We had 3 main projects: a set of "building blocks" of simple shapes to help teach some pattern and sewing skills and spark the imagination; a simple silhouette 2-sided piece with painted or stitched embellishment, and a final multi-limbed piece. 
 I posted my porcupine and floppy kitties before, and here are the last 2 sample pieces I made for the class. The gray kitty was a more sculptural/tailored piece, unlike the very simple shapes of my previous kitties. Unfortunately his back paws were angled wrong and he didn't stand up the way I wanted. Back to the drawing board. But it was nice to have a piece that required some adjustments, as it offered an opportunity to show how to fix some construction mistakes. The puppy was a quick handsewn felt sample I made in order to demonstrate a button joint. His 4 legs rotate very nicely. It was great to get to make a few softies and take a time out from my everyday studio work- I'm not going into business any time soon, but they're an awful lot of fun to make.
 These are a collection of dolls one of my students created. She started off hesitantly with a simple pattern she found online (the red-dressed one on the left), but then went to town finding patterns and making all different kinds of dolls. She mastered hair and clothes, and expressions. I think she prefers machine sewing over hand-sewing, but she really got a lot done that way!
 I had another prolific student who took each of the projects and expanded them with her imagination and creativity. She made all of her pieces in a nice fleece fabric, that was so soft and cuddly it makes these true "softies". These were mostly handsewn. The doll and frog both have button joints and are very poseable. The bird required some pipe cleaner mechanics to make it stand independently.
The sweetest piece was this little, handsewn felt and corduroy bear made for a new preschooler to be his nap-time buddy.
I hope my students enjoyed the class, and feel confident in their ability to transform their imagination into their own pattern pieces. It seems like they're off to a good start.

I'm on a little break from Fleisher for a few weeks until the Fall semester begins. If you're interested in Fall classes it's not too late to sign up! I'm teaching Color theory and Stitch and Surface for adults, an after school basic design class for 11-13 year olds on Wednesdays, and a fiber class and silkscreen for 11-13 year olds in the free Saturday kids program. Spread the word!

Monday, August 1

Some more softie fun

The great part about teaching a class sometimes is that I get the fun of making samples. The Softies class for adults at Fleisher is halfway finished, and I've been able to make a few myself to demonstrate specific skills. Below is a porcupine softie. He was made by drawing a pattern, tracing and flipping onto white broadcloth, using black fabric paint to create detail and texture, and then cutting out, sewing, and stuffing. He was a sample piece for the idea of a 2D silhouette shape becoming a 3D object when stuffed.
 For my porcupine I actually asked on facebook for ideas from my friends what animal I should make. The person who responded is getting to keep this one.
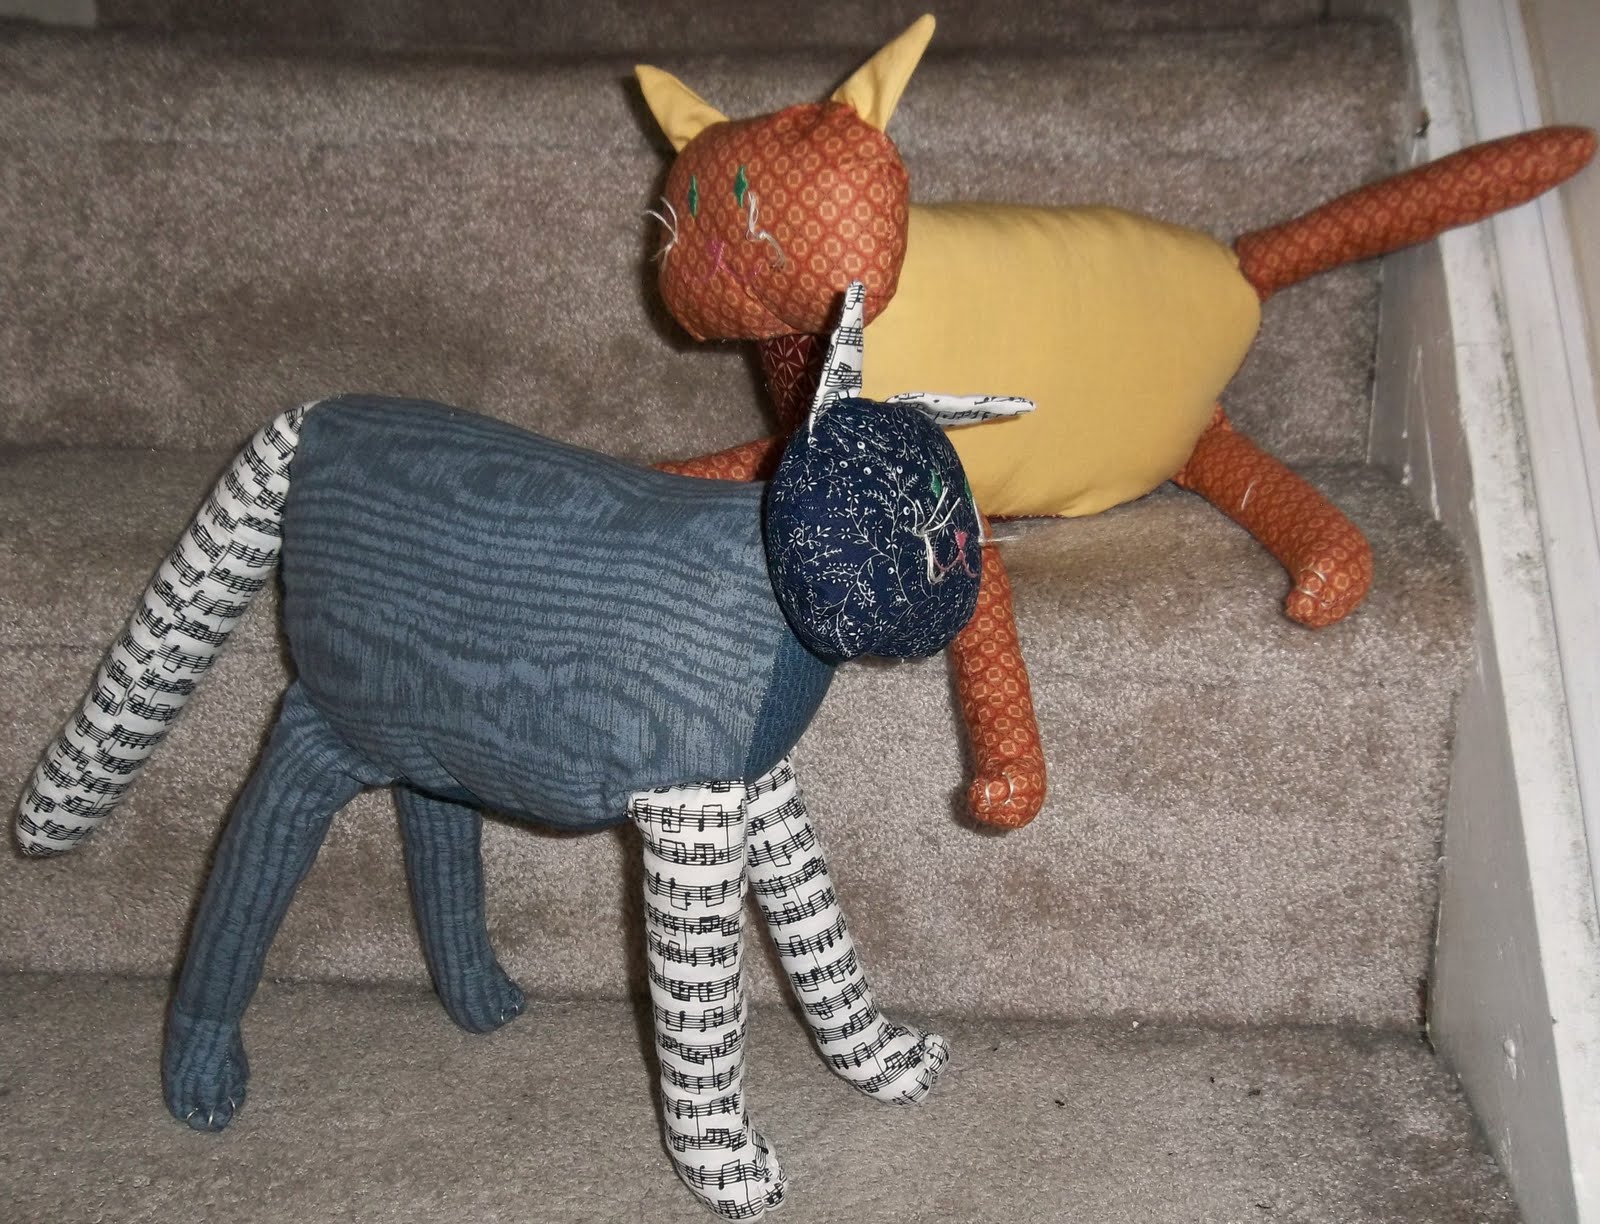
 My 2 kitty cats are sort of a sample piece. I'm going to use them to show how to make a more complex and multi-limbed construction. The ears, tail, and legs have to be sewn and stuffed before being inserted into the head and body pieces, and then the head and body are stuffed and joined together with a blind stitch.
I made these two for my niece's twins, because they got so excited by my student's cat softies I'd also posted on facebook. There's a calico cat which reminds me of my mother's cat, Putter, and a tuxedo/musical cat which is a lot like my own cat Jolie. They're an awful lot of fun to play with as a pair, especially when someone discovers a mouse finger puppet in my sewing nook, and ends up playing cat and mouse and laughing with me all night.
Adults shouldn't forget how to play- it's important to play with your kids, and the ability to play is a key component to artistic and creative thinking!

Monday, July 25

My very last grad studio!

For the past 3 weeks I've been taking an intensive 9-4 bookbinding and print portfolio class at Tyler to fulfill my very last graduate studio credits! I'm both happy and nostalgic to be so close to the end of my master's studies (I want to be a perpetual student). But here's what I made this past few weeks:
 We tried out a few different bindings including a Japanese stab binding, an adhesive flip book, and several maze books. I already knew how to do the stab binding with odd number holes, but now I know even-numbered holes as well (start at the top hole instead of the center). I've got my maze books corralled in a little purple sleeve with a notch clasp. We also learned how to construct various boxes, so my first book got a little purple magazine-style box/sleeve, and I also made a map-covered box just the perfect size for holding folded roadmaps.
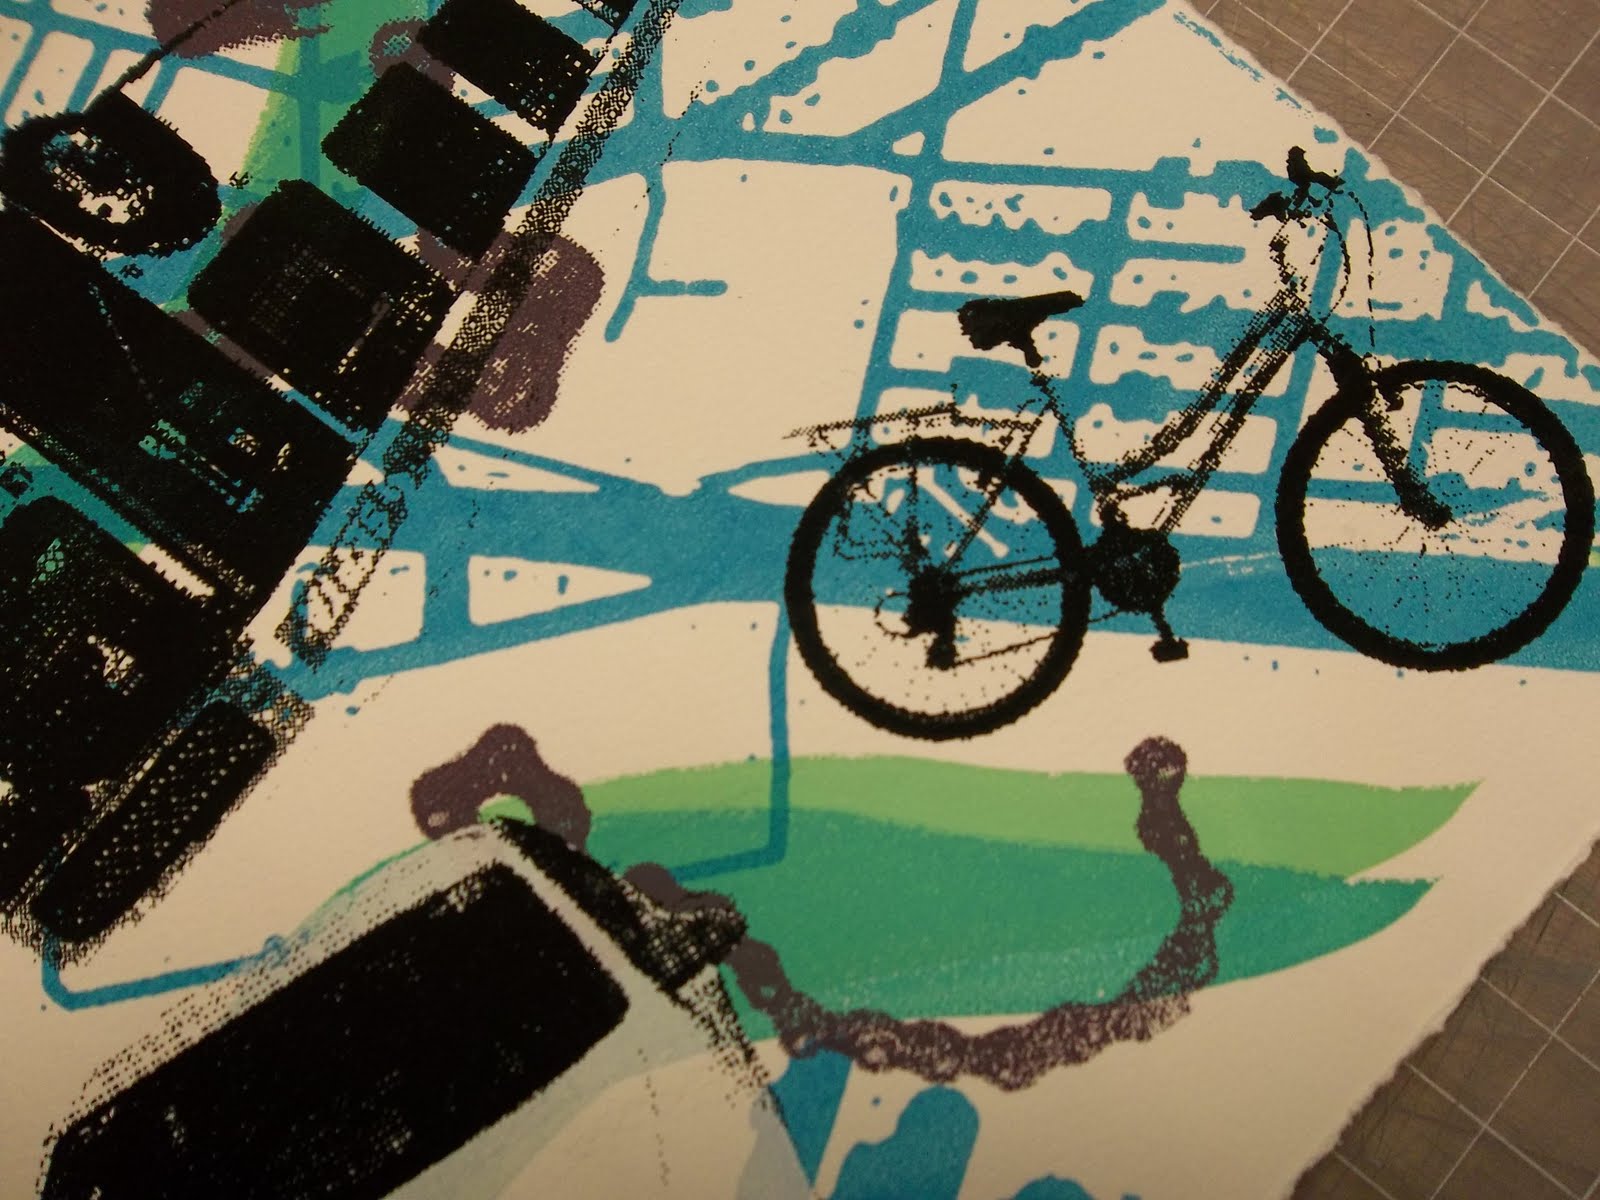
 My first real book was printed as one large image, below, and cut and folded into a little maze book. It has the map printed on front and back, a river-like path in green, a bicycle-chain path in purple, the words "Who is in the driver's seat?", and all of the various modes of transportation that have been a part of my life. There's my little red tricycle, my dad's big white van, a school bus, an Air France plane, a PATCO train, my first car (a chevy corsica), a SEPTA bus, a Turkish airlines plane, a Bosporus ferryboat, my white Jetta, and my current bicycle.
 I'm very happy with how layered it is.
 I also like how it starts and ends on a bicycle- the mode of transportation I love the most for the sense of freedom it gives.
 Printing and finishing that up took up the first two weeks, partly because I missed the mornings of week 2 due to teaching camp. But the final project fulfilled an idea I've wanted to do FOREVER.
 It marries my love of origami, coptic binding, color theory, and pattern essentials. I printed a gradation of flats from cream to dark brown, then printed subsequent layers of crosshatched stripes on the exteriors. The interiors have a gradation from pink-orange-yellow-green-teal- and purple shifting from stripes to squares to triangles in increasing complexity and back.
 Each page (56 of them) was folded into an origami book that springs open and snaps shut revealing a surprising interior to these rather formal and monotone exteriors (got to watch out for the quiet ones).
 The great part about the coptic binding is that it allows the pages to flex, snake-like. It's a very playful book/sculpture.
In critique, my professor noted how meditative it was- the layering of the print colors, actually crosshatching the print instead of printing crosshatch screens, all the folding, the one-by-one process of coptic binding, and the motions the viewer must go through to view the interiors. Seems I can't get away from that meditative process. It's the same as stitching- all that repetition and slow building of something.
I could use some meditation.

Saturday, July 23

Critter Softies 2011

It's summer art camp season! Critter Softies was such a hit last year, that we offered it again this summer at Fleisher. I had 8 kids aged 8-10 join me for a new adventure in fiber art. We did felt finger puppets, a 2-sided marker detail creature, and a multi-part patchwork creature. Here are some of he results:
 I loved this monkey (that's a lot of marker coloring since we started with white muslin), and this patchwork duck. The duck's wings were left unstuffed for some flop, and the felt beak was sewn on before assembly so it would also stick out and flop a bit.
 My one boy in the class made this "sick dinosaur" complete with thermometer, bandaids, blanket, and tongue sticking out. His felt creatures include a family, 2 dinosaurs, and a house for the family to hide in.
 The rainbow unicorn was quite a feat to stuff with those skinny legs and the clumpy fill I got from DickBlick. I've now discovered that brand names in stuffing matter- Polyfil and Crafter's Choice are the best- nice and squishy.
The turtle at the top there ended up being a 2-headed turtle because I didn't catch her in time to remind her to flip her image for the 2 sides to meet up properly. But her teddy bear turned out really well.

This turtle had a whole patchwork of felt squares to applique on for the shell, and the bunny rabbit had a very complicated selection of patchwork that she planned out before we could sew it.
The kids were incredibly focused for a whole week of softie-making. It's always a bit of a whirlwind because I do all the machine sewing for them. But I love getting to be a part of their creativity and help them bring the visions of their imaginations to life!

This summer I'm also teaching a grown-up softies class. We're 2 weeks into a 6-week class, and there's already been some fabulousness I hope to share soon.