Pages

Monday, February 25

How to pass the time

I have a new sketchbook. On Sundays my daughter has a 3 hour language lesson, and I stick around to socialize with the other parents. On our way in today she told me I should write and draw pictures in it for a story. I asked her what it should be about, and she said, "The fox who stole winter". I asked her to elaborate a little, and she proceeded to spin a tale of a fox who worried about skinny rabbits, and who wanted it to always be warm and sunny so the rabbits would come out and fatten themselves up on the grass. So I sat and drew this for the first half hour:
I think it would make a good myth- how the fox got his white-tipped tail... trying to sweep up the snow.
The brain is an amazing thing. Where do such ideas come from? What made her think of foxes? How did this image spring from my imagination and pen? How lucky I am to share a creative spirit with my child!


Monday, February 18

A bit of sky

Cameras just don't do justice to what the eye can capture. At least point and shoot ones can't. Moments before heading to the studio I saw the sky streaked with yellow, pink, and purple. In the photo, it's just all overblown. But in my memory it serves as inspiration. My dye-painted piece has all the reverse applique complete, and now I'm seeding the sky with those streaks of color. I'm loving this piece. The wintryness of it. The high contrast. The crisp edges. There's a little guilt in making something beautiful. A worry that it isn't important or worthy enough.
On the other hand, it's a true impression of cold and winter, and the joy of light, however brief. Here I am huddled into my scarf, my nose and fingers too cold to keep working, and the cold northern light from the studio windows waning, leaving the warmer but weaker artificial lamplight. I can't wait for spring.


Sunday, February 10

The lost art of reverse applique

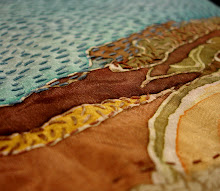
Well, perhaps not totally a lost art, but one worth experimenting with once in a while. I love reverse applique because whereas most stitchery builds UP surface texture, this technique allows you to dig DOWN INTO the surface. There's a subtle sculptural quality to embroidery, and this is another way to push and pull the surface. A look at the sunset sky tonight on my way to the studio inspired me to cut into my dye-painted tree piece to create a line of color to make a horizon.
 To get started with reverse applique, you first need to baste together a fabric sandwich. I enjoy stitching through 2 layers of fabric all the time, and my purple fabric matches the size of the top piece. However, a small patch piece, larger than the area to be cut away by about 1/2 inch all around can be basted to the back of a fabric instead. Select an area to be cut away, separate the layers, and snip the center of the area. Cut to the corners or angles to create flaps that can be folded back. For example, the X-shaped cut above creates a square when the flaps are folded under. I'm doing blind stitching on a turned edge, but a raw edge can be used instead by cutting out the entire shape to its edges and then stitching a decorative stitch over the edge. But back to blind stitch:
 The flaps are folded under to make a turned edge. I added pins to make everything lay flat and lined up, and remove them as I stitch. I thread the needle and come up at a corner between the layers in order to hide my knot. Blind stitch is sort of the reverse of hem stitch. You try to make the tiniest stitch between the layers and travel around in the fold. Wherever the thread is coming out of the fold or the base cloth, you insert the needle RIGHT NEXT to that point in the other layer, then slide along about an 1/8 of an inch:
 Pull tight enough so that the 2 layers touch snugly but without gathering or puckering the fabric. If the cut areas are close together, leaving narrow top layer sections, the flaps may need to be trimmed smaller so that they can still fold under and fit between the layers
 I'm very excited about these blue violet windows into the background. I think once they go all the way across the piece they will help separate snowy ground from cloudy sky. Cutting away to another color also adds more color contrast and drama without having to stitch every bit of the surface, a time saver when doing larger pieces.
I got this far before losing all the light of the afternoon. My lamps help, but just aren't quite enough for lighting my work when working this precisely. It took me about an hour to find a backing cloth, cut it down, baste the pieces, decide to take the plunge and cut into the fabric for the reverse applique, then snip and stitch these 3 lovelies. I can't wait to get back tomorrow and do some more in proper daylight.

Saturday, February 2

First Month

 Well, I managed to clock 20 hours in the studio in the moth of January. I'd like to aim for 40 a month (the equivalent of a regular work week a month, but those kinds of hours are going to have to wait for warmer weather when the building is a little nicer to stay in for longer than an hour!
 In those 20 hours I managed to nearly complete the window portrait I've been working on for over a year. I did some dye monoprinting for the background of a large wall piece and completed a small color study and picked out fabrics for it.
 I also experimented with some dye painting, and started a shibori landscape piece. And yesterday I finally pieced together the shibori and bridge printed piece at the top of this post. I don't feel like I got as much stitching done as I wanted, but my surface design experiments are going well. It's interesting to measure my artistic time and effort. Since I'm paying for the privilege of a working space now, I want to make it worthwhile.
This is a good start.