Pages

Showing posts with label craftiness. Show all posts

Monday, August 12

A week of workshops

I arrived back home and then jumped right into teaching a week of Stitch and Surface summer intensive. I had a lovely group of ladies, including some familiar faces and some fellow elementary art teachers, so we had a great time learning and chatting. Sadly I didn't take a single picture!! However, I can share the samples I made instead. we started off with an easy symbolic stitch sampler, experimenting with new stitches on a personalized shape. We did a smattering of shibori experiments including pole wrapping and clamping. We tried gel medium photo transfer on fabric. And we created a 4x6 fabric postcard using a variety of the fabrics that had been created over the week.
I'm not a big fan of adhesives in fiber art. However, I knew a number of the students were collage and mixed media afficionados, so we tried gel transfers to create a photographic image on fabric. The trick is to paint a layer or 2 of acrylic medium onto a color photocopy and press and smooth it onto fabric just after painting out the last layer. We let them dry overnight, and then dampened and scrubbed off the paper to reveal the image adhered to the fabric. This technique does reverse images, so text is reversed, but I kind of like how that altered my graffiti transfer above. I think this technique would work better on a wood surface. However, it was interesting to have a different surface to work on in stitch. In fact, I may do more fabric postcards using the transfer technique..
 My fabric postcard was inspired by my Montana trip, of course. I used my arashi shibori sample as a background layer and then showed everyone how to use fusible web with fabric scraps to design a composition. Finally I embellished the surface with some straight stitches, feather stitch, buttonhole, and satin stitch. I was planning to put in "O Montana" in the sky, but the O looked so much like a moon, which made the sky look like aurora borealis, that I just left it. Finally I demonstrated how to bind the edges with some double folded bias tape, which framed it quite nicely.

Although this fabric postcard could probably be sent as is through the mail, I decided to protect it with a custom-made envelope cut from a brown paper bag. It's headed back to Montana as a thank you!

Saturday, July 6

Happy 4th of July

A bit belated, but with the 4th in the middle of the week, there were lots of activities still going throughout the weekend. We ended up down at Penn Treaty Park for  free concert by Rockfish. Sometimes living in the city can make you feel anonymous, but our neighborhoods have strong identities and tonight Fishtown felt like a small town.
 The band was meh. We listened, but had more fun just hanging out making clover chains with my daughter and playing with my new camera.
 The grass was soft and cool, and the river brought  breeze to cool off the day.
 My desire for holiday tradition has been appeased. Happy Independence Day!

Saturday, June 22

Learning instead of teaching


It's been very fulfilling to sit on the other side of a classroom recently. As a teacher I'm always helping others be creative and giving them ideas, which leaves little in the well for my own artistic creativity. But when you get to be a student you only have to worry about your own project and ideas. I love how even in a room full of people my attention can shrink down to the space between my eyes and my hands and I'm on a little island of my own invention.
The animal sculpture class at Fleisher finished up about a week ago. On the final night we worked on painting and patinas to give the fired clay some life. My horse skull didn't need much- the raw fired white clay is bone-like, but I gave him a gold tooth just because.
Through the class we worked from live animals, from taxidermy, from real skulls, and from pictures. I used my own sketches from the Wagner Free Institute for inspiration. The crow I sketched here:

 Became 3 dimensional:
For structure I had to attach him to a stronger branch base, which I hollowed out. You can't see in this shot, but there's also a little beetle inside the log. The eggs and raven were painted with black gesso for a matte coating, and the log was painted with a bronze patina. Then I brushed gold acrylic over the eggs, and used black nailpolish on the eyes and feet to make them shiny and create more contrast.This turned out to be my favorite piece from the class.
Today I went to Square Peg Artery & Salvage for a modular origami workshop with Rich Cotton. He showed us how to tear down an A4 sheet into 32 small pieces for the proper proportions- surprisingly this form of origami does not start with a square piece, but a rectangle. Then we folded the units (hotdog, hamburger, 45 degree angles to center fold, 45 degree angles in on leftover flaps, fold flaps over, and fold in half to show triangle form with rear pockets.) Hahah! Those directions are really just for me to remember, and if anyone could figure out how to do it based on that sequence I commend you! The open ends of the triangles fit into the rear pockets of another triangle, and linking them into a chain can create a circular base for a vessel form. He showed how to make swan forms, but I just made an asymmetrical bowl. I'm not sure if I could do this with  any of my kids at school, but it's a thought.
The other reason for taking classes is to get new ideas or strengthen skills for my teaching. I've been a specialist in fibers for so long, but a really good art teacher needs to have a breadth of expertise. My sculptural skills are not as strong as my 2D, so these 2 workshops have been beneficial.

Saturday, March 30

Happy Easter!

I was asked to bring dyed eggs to Easter dinner tomorrow (maybe because I'm supposedly the "creative one"). My original plan was just to marbleize some eggs. While we were doing that I wondered what the oily food coloring would do to paper, so I cut some egg shapes out of some printer paper and laid them over the bowl of oily dye (success!). Finally I thought the eggs could use some holders, so I cut up some paper towel rolls into 1 inch rings, wrapped them in green tissue paper and fringed the edges for grass. The paper egg shapes turned into flower petals on my basket tray with the eggs and holders in the center. Some jelly beans make it complete. This is ridiculously cute and crafty. Not my usual style. Pin away!

PS. We rigged up a little lottery hidden in the eggs. The lucky recipient of a hidden bird sticker will have to sing a song, the hidden frog sticker winner will have to do a silly dance, and the 2 winners of the hidden house stickers will have to do all the dinner cleanup!!

Saturday, July 14

Life goes on, and monsters are made.

I'm back in the classroom again- this time for summer camp and a residency at Fleisher, doing what I'm supposed to be doing. I was worried at first- I had a full roster of 15 kids for my softies class. The most I've ever had for it before was about 8, and it's always a challenge getting things finished by the end  of the week. However, only 12 showed up, and they were 12 incredibly focused and talented 8-10 year olds. I also had the luxury of an awesome assistant and a teen intern, so I didn't have to be helping all 12 at the same time! We managed to get lots of creatures finished. We started with handsewn felt pillow/pincushions with appliqued initials so the kids could practice stitching. Then they made simple 2-sided animals, also handsewn. Finally we made some monsters with separately sewn and stuffed limbs and handsewn embellishments. Here they are:
 Usually I have the kids draw what they'd like to create and then consult with me to draw out the pattern pieces they'll need. Then the kids cut everything out, trace their patterns, and bring me a stack of all their pieces ready to sew. I sew, clip, and flip the pieces and the kids stuff the limbs. They handsew on their eyes and details, and then bring everything back to sew into the body. Finally they stuff and handsew the closure.
 We had a donation of upholstery samples given to us recently, so the kids found some interesting textures and patterns for their creatures. But some kids stuck with felt. I like how easy it is to sew felt, but I hate how the stuffing always pokes out and gets fuzzy...
 Three of the kids had taken my softies class after school in the winter, and it was so great to see how their sewing skills had improved. They have amazing imaginations!
 Here's a menagerie of monsters:
I love seeing their drawings turn into real toys. I could do this all the time. However, next week I'll be doing a mystery painting with the 11-13 year olds instead.

Sunday, December 25

Merry Christmas!

 We save decorations for Christmas Eve- It makes it more special I think when it's not up for a whole month. I have a tiny tabletop tree and I let my daughter pick out the ornaments this year- many of them are handmade from years past.
 The windows are covered in snowflakes (my mother cut and laminated- the images in them tell the Jesse tree story) and some bright Waldorf stars made of origami paper. I got the pattern here.
 We made some origami garlands too. My daughter folded 24 paper cranes and I made a string of stars. The black and grey star is not a waldorf one, but the end-product looks similar. I like garlands- they really make things look festive.
 One of the presents I received this morning was a Frido Kahlo finger puppet my daughter thought I should have. It was made by Abbey Christine and can be found on Etsy if you need your own. She wasn't sure if I'd like it, but I think things like this are great gifts for art teachers! I can't wait till I have an opportunity to use it with some kids.
My creative forces are being directed towards the kitchen now- I'm the official dessert baker for family dinners. I think this is my 99th post of the year. I'll make one more sometime this week to make an even 100 for 2011.
I hope everyone is enjoying the holiday, making things and spending time with friends and family.

Thursday, December 8

It's beginning to look a lot like Christmas...

I woke up this morning and decided to be productive. Shouldn't every day start off that way? Well, I intend to every day, but things don't always work out like that. TODAY, they did. I finally got some signs edited, printed, and laminated for the silkscreen studio at Fleisher, and then headed over for a day of printing. When I'm working in the silkscreen studio I always marvel at how much I can get done. It's the accomplishment that comes with the mentality of "going to work", which I lack when I'm working on art at home. Ah if only I could afford a real studio- imagine what I could get done!
 After finally finishing up the Y and K layers of a print I've been working on a 4-color process image I decided to make my Christmas cards as well! I cut down a sheet of 30x22 Rives BFK to get 20 pieces of 5x6. The final card dimension is 3x5 to fit into envelopes I already had. I made a simple flat stencil from contact paper to print a snowy hill on the inside of the card. I drew the 3 trees for the outside and wrote out the lyrics of "In the Bleak Midwinter" (my favorite Christmas hymn) for the inside on 2 pieces of duralar to use as photo stencils. I was a bit impatient on my emulsion, but it turned out okay with some masking tape fudging. (that's why they call it "masking" tape!)
The printed cards were folded in half, and the silhouette of the tree was cut away to reveal the inside hill. A final touch up of glitter glue for the snow and they're done! Of course, after writing out a list of recipients I'm wishing I'd made more than 20.... c'est la vie.
In other craftiness, I've started my annual snowflake ornaments. This year it's white cross-stitch and rice stitch (a big x with crossed legs that ends up looking like 5 crosses) on black aida cloth. There's no pattern- I'm just improvising as I go, and want every one to be different. I might look up a Quaker pattern later to make one for my grad advisor (remember my Quaker needlework paper last year? she loved it.) Freehand embroidery patterns kind of bother me- I see lots of embroidery patterns for sale on-line, but I don't see the appeal. Find any picture you want and trace it onto fabric with some carbon paper- Voila. Cross-stitch when it's linear is kind of easy to figure out. It's only the multi-colored ones you've got to get a pattern for and I would say get the software to turn your own images into patterns for cross-stitch. If you can figure out the pattern from my pictures you're welcome to it- better yet pick up some aida and some thread and play with vertical, horizontal, and diagonal lines until you get a snowflake-looking thingy. Sorry about my horrible photography lately- I'm stuck with the flipcam photo option. If Santa wants to get me a digital camera I will be most appreciative! You can still get the idea though:

Sunday, August 21

Softie roundup!

For the past 6 weeks I've been teaching a softies class at Fleisher for adults. Here's a glimpse of some of the creations my students came up with. We had 3 main projects: a set of "building blocks" of simple shapes to help teach some pattern and sewing skills and spark the imagination; a simple silhouette 2-sided piece with painted or stitched embellishment, and a final multi-limbed piece. 
 I posted my porcupine and floppy kitties before, and here are the last 2 sample pieces I made for the class. The gray kitty was a more sculptural/tailored piece, unlike the very simple shapes of my previous kitties. Unfortunately his back paws were angled wrong and he didn't stand up the way I wanted. Back to the drawing board. But it was nice to have a piece that required some adjustments, as it offered an opportunity to show how to fix some construction mistakes. The puppy was a quick handsewn felt sample I made in order to demonstrate a button joint. His 4 legs rotate very nicely. It was great to get to make a few softies and take a time out from my everyday studio work- I'm not going into business any time soon, but they're an awful lot of fun to make.
 These are a collection of dolls one of my students created. She started off hesitantly with a simple pattern she found online (the red-dressed one on the left), but then went to town finding patterns and making all different kinds of dolls. She mastered hair and clothes, and expressions. I think she prefers machine sewing over hand-sewing, but she really got a lot done that way!
 I had another prolific student who took each of the projects and expanded them with her imagination and creativity. She made all of her pieces in a nice fleece fabric, that was so soft and cuddly it makes these true "softies". These were mostly handsewn. The doll and frog both have button joints and are very poseable. The bird required some pipe cleaner mechanics to make it stand independently.
The sweetest piece was this little, handsewn felt and corduroy bear made for a new preschooler to be his nap-time buddy.
I hope my students enjoyed the class, and feel confident in their ability to transform their imagination into their own pattern pieces. It seems like they're off to a good start.

I'm on a little break from Fleisher for a few weeks until the Fall semester begins. If you're interested in Fall classes it's not too late to sign up! I'm teaching Color theory and Stitch and Surface for adults, an after school basic design class for 11-13 year olds on Wednesdays, and a fiber class and silkscreen for 11-13 year olds in the free Saturday kids program. Spread the word!

Monday, August 1

Some more softie fun

The great part about teaching a class sometimes is that I get the fun of making samples. The Softies class for adults at Fleisher is halfway finished, and I've been able to make a few myself to demonstrate specific skills. Below is a porcupine softie. He was made by drawing a pattern, tracing and flipping onto white broadcloth, using black fabric paint to create detail and texture, and then cutting out, sewing, and stuffing. He was a sample piece for the idea of a 2D silhouette shape becoming a 3D object when stuffed.
 For my porcupine I actually asked on facebook for ideas from my friends what animal I should make. The person who responded is getting to keep this one.
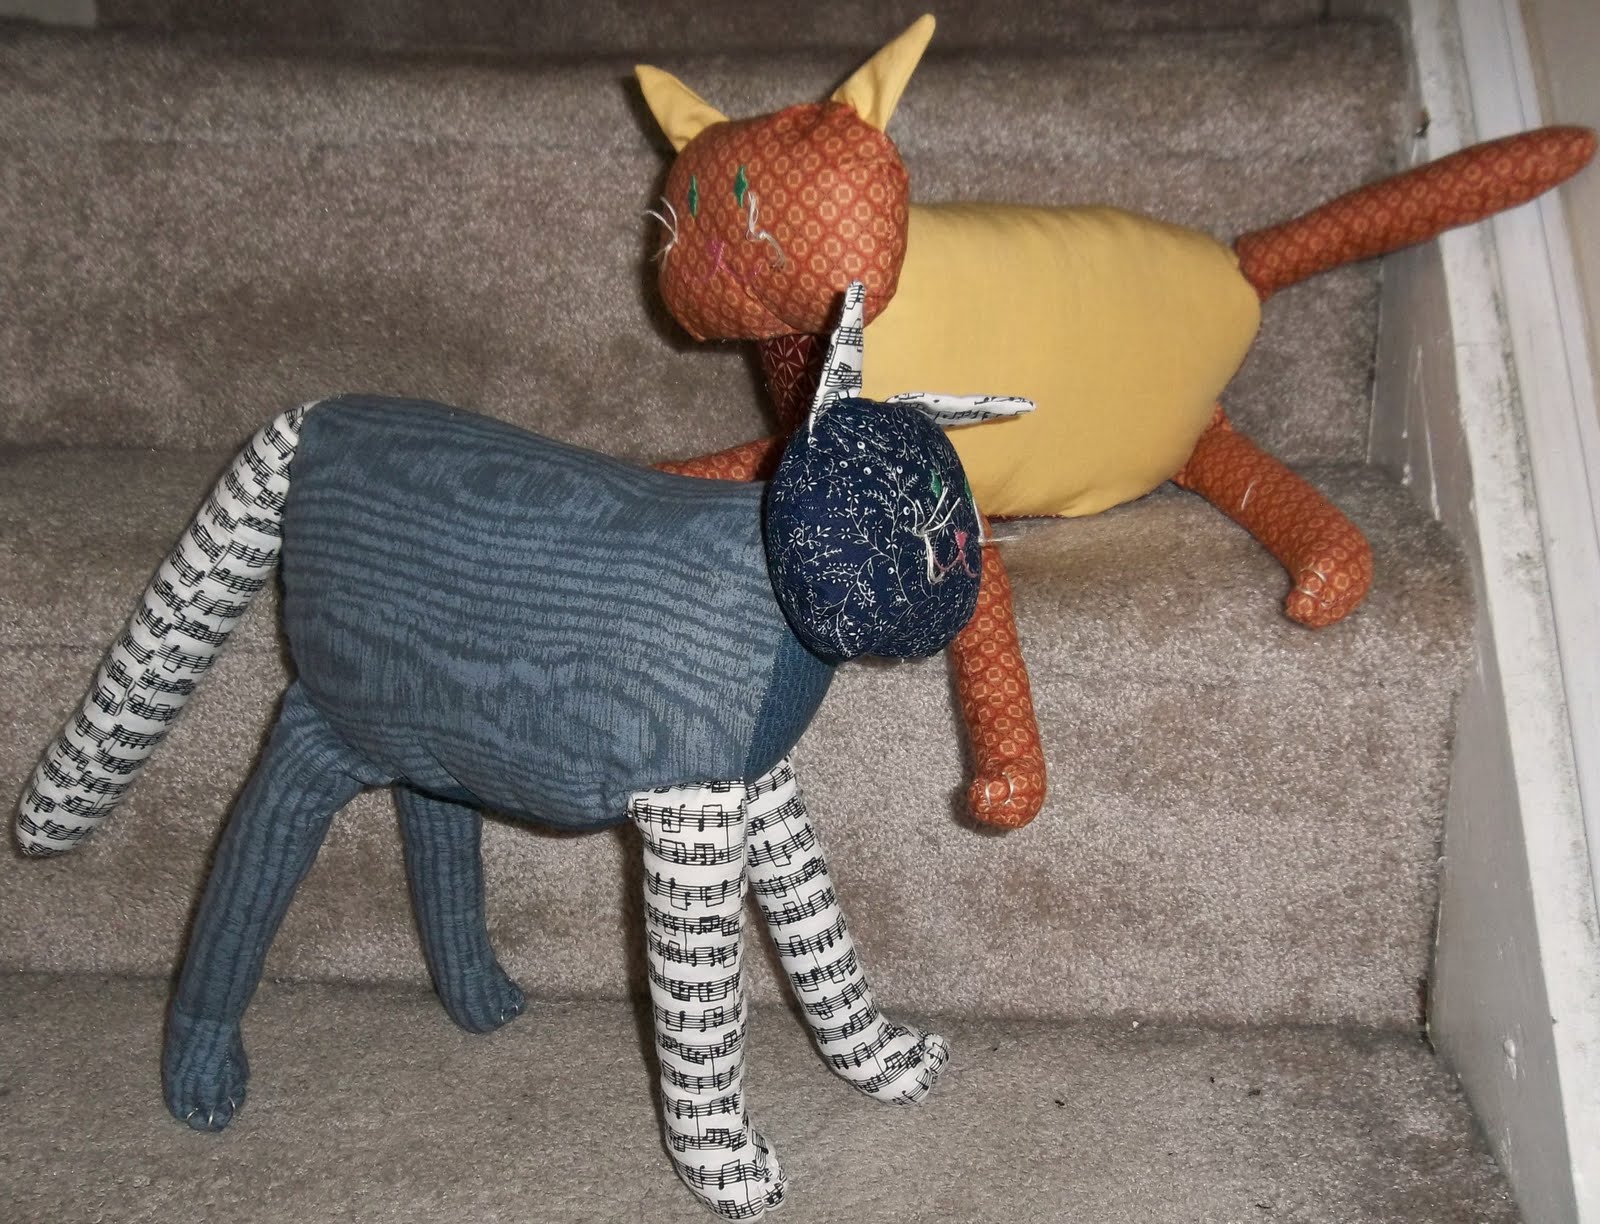
 My 2 kitty cats are sort of a sample piece. I'm going to use them to show how to make a more complex and multi-limbed construction. The ears, tail, and legs have to be sewn and stuffed before being inserted into the head and body pieces, and then the head and body are stuffed and joined together with a blind stitch.
I made these two for my niece's twins, because they got so excited by my student's cat softies I'd also posted on facebook. There's a calico cat which reminds me of my mother's cat, Putter, and a tuxedo/musical cat which is a lot like my own cat Jolie. They're an awful lot of fun to play with as a pair, especially when someone discovers a mouse finger puppet in my sewing nook, and ends up playing cat and mouse and laughing with me all night.
Adults shouldn't forget how to play- it's important to play with your kids, and the ability to play is a key component to artistic and creative thinking!

Saturday, July 23

Critter Softies 2011

It's summer art camp season! Critter Softies was such a hit last year, that we offered it again this summer at Fleisher. I had 8 kids aged 8-10 join me for a new adventure in fiber art. We did felt finger puppets, a 2-sided marker detail creature, and a multi-part patchwork creature. Here are some of he results:
 I loved this monkey (that's a lot of marker coloring since we started with white muslin), and this patchwork duck. The duck's wings were left unstuffed for some flop, and the felt beak was sewn on before assembly so it would also stick out and flop a bit.
 My one boy in the class made this "sick dinosaur" complete with thermometer, bandaids, blanket, and tongue sticking out. His felt creatures include a family, 2 dinosaurs, and a house for the family to hide in.
 The rainbow unicorn was quite a feat to stuff with those skinny legs and the clumpy fill I got from DickBlick. I've now discovered that brand names in stuffing matter- Polyfil and Crafter's Choice are the best- nice and squishy.
The turtle at the top there ended up being a 2-headed turtle because I didn't catch her in time to remind her to flip her image for the 2 sides to meet up properly. But her teddy bear turned out really well.

This turtle had a whole patchwork of felt squares to applique on for the shell, and the bunny rabbit had a very complicated selection of patchwork that she planned out before we could sew it.
The kids were incredibly focused for a whole week of softie-making. It's always a bit of a whirlwind because I do all the machine sewing for them. But I love getting to be a part of their creativity and help them bring the visions of their imaginations to life!

This summer I'm also teaching a grown-up softies class. We're 2 weeks into a 6-week class, and there's already been some fabulousness I hope to share soon.

Tuesday, March 29

Giveaway!

Hello there........... I'm feeling generous today and thought I'd try out one of these giveaway things to see if anybody's actually reading this nonsense I post. I made these embroidered pendants a few years ago and have a few still floating around. If you'd like to have one of these for your very own, please post a comment with your favorite color and tell me if you lurk because you like when I show my student work or my own work or why it is you like reading Colored Thread....
I can't promise you'll get either of the ones above, but I'll try to pick one out that's closest to your favorite color that you tell me. You have until Saturday, April 2nd, noon EST to post a comment and I'll pick a name out of a hat or something. Ready, Set, Go!

Tuesday, January 4

the gift of play

Anybody remember seeing these?
 I posted them a month or two ago in one of my "on the walls and in the halls of Tyler" posts, intrigued by the idea of shape components for creating sculptural variations. Well, one of the gifts I got this Christmas was from my creative mother who stops by and reads the blog every once in a while. She collects/saves all the Christmas cards she receives in the mail every year and finds ways to transform them. My sisters got Christmas card bowls with crocheted seams, but I got a box full of Christmas card COMPONENTS! =)))))
 This shape is just like the one front and center in the picture up top, and the shape below is just like the sculpture in the back corner of the photo. Doing these on the scanbed made me realize how little "focus" there is on my scanner, but you can see a sort of ghost of the sculptural forms I've been playing with.
The size of the components makes it a perfect thing for sculptural "doodling". Instead of a pad and pencil to absentmindedly play with drawn forms, these fit together quickly, easily, and portably for random creative play. We need a new word. Something that means a sculptural doodle. Any ideas out there?

There's something special about random creative play. It turns off the busy analytical commentator in the brain and allows for flow and serendipity to occur.

Thursday, November 11

"scraps" book- coptic binding

I've been wanting to try out a coptic binding one a book, as I think I want to include it in my Stitch and Surface class next semester as a project. So after cutting up a watercolor painting for another project this evening, I collected the scraps to try out this binding. The best thing about coptic binding is it lays flat when you open it- perfect for sketchbook purposes. In fact my favorite sketchbook ever was a handmade, coptic bound book made by Michelle Wilson.
 Above shows the actual size of the book laid flat. Below shows the pages standing open. There's a lot of "spring" in it right now, which I hope will relax under some weights overnight. They're single page signatures, one side with watercolor, the other side laminated to a piece of black tissue paper. The cover is some recycled card stock laminated also with tissue paper and watercolor end pages.
If you're interested in how to do coptic binding I found this website tutorial very helpful! I'm going to have to do another book project for my watercolor class so I hope to do a  more normal-size book with a LOT of pages to show off the binding.

Monday, October 11

Henna hands

A friend of mine had a henna night/birthday party tonight- a welcome repose from all my school/work life. It was great fun being one of the "artists" and doodling on other people. Here's my own hennaed hand:

Wednesday, August 18

Tweens (feel free to roll eyes)

There's been a bit of a Twilight obsession going on around here. I can't complain as reading time is up, TV time is way down, and it has encouraged a flurry of creativity. Below are the "Edward and Bella" hand puppets my daughter and I collaborated on this week. She came up with little skits to perform and everything.
Ah, the things we do to indulge our children...

Friday, July 30

Critter Softies

For the past week I've been working with a group of 10 kids aged 8-10 years old making "critter softies", aka stuffed animals of their own creation. We started off with handsewing simple 2 sided felt shapes. Above there's a gecko, a leopard, and 2 fish. Two more fish below. And here are a yellow hamster and 2 puppy dogs. We drew the animals first, then cut patterns out of the drawings. Some of the kids drew from imagination, others looked at an animal encyclopedia. We talked about finding the simple geometric shapes in the animal's picture, and drawing a bit "fatter" than usual so we could make them out of fabric.We progressed to larger 2-sided creatures, this time made out of white cotton duckcloth with fabric marker detail drawing to make them more colorful, patterned, and realistic, thinking about how the backs and fronts look different. When it came time to sew I had the students control the sewing machine pedal speed while I manipulated the curves with the needle. Above is a sidewinder snake with amazing abstract patterning. And below is the most elegant swan with felt feather details.
For the last 2 days we looked at how flat geometric shapes become 3-dimensional forms when seamed together, and explored cylinders, pyramids, spheres, and cubes for thinking about more complex sculptural forms. The last project requirement was to have movable limbs by sewing and stuffing the arms etc before assembling and stuffing the body.
Above is a tree kangaroo. It had a tail that curved up the back nearly as long as the body.Here we have a penguin from the 2nd front/back project, 2 felt-limbed monsters, and a giant shark with stuffed fins and felt flipper.
Here are one boy's creatures, at right his 2 sided snapping turtle and at left a prehistoric shark with stuffed felt tentacles, flat felt fins, and 3 piece body. This kid had amazing attention to detail- note the gills on the shark and the very carefully colored turtle shell.
Above is another version of the giant shark- 2 boys shared a pattern they had drawn together, but chose different fabrics.
Above is one girl's efforts: a 2 sided pigeon with pipe cleaner feet and red-bead eyes (check out the multi-colored stippling on the neck!!!!), and a very cushy "zebra" with bent-down neck as if grazing.And finally we have a very sweet leopard that looks more like a cat, but with a head-body connection I'm very pleased with. The body opening was gathered closed and then sewn to the back of the already-stuffed-and-closed head.
I'm really not sure how we got all of these finished in 5 days. About 30 stuffed animals were created this week, and there was a very free-style open studio feel to the classroom as the kids were independently working and solving problems and helping each other while I mostly sat at the sewing machine to zip seams up for them. It's really magical to see a child's drawing become 3-dimensional. I hope they enjoy playing with them, and they don't sit on a shelf like most sculpture projects.