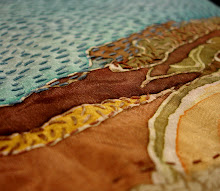
This past Saturday was the last session for Silkscreen on Fabric at Fleisher Art Memorial. We had just enough time to finish up our repeat prints, and they turned out SO GREAT!
Trinh's flower print was done in pigment first, then the yellow and purple was dye painted in. It was printed on a light cotton gauze- perfect for a spring scarf or summer wrap.
Susan's repeat design worried me at first. I had advised that any 2 color prints should have shapes that may interact but not rely on perfect registration... hahaha. This one did rely on registering a blue detail print over a yellow color shape.
We managed to get the yellow layer printed with decent registration for the repeat. Then, to my surprise, the blue layer printed quite easily. Lining up the registration was a cinch since we could see the yellow forms clearly through the screen.It helps, too that the bright, light yellow has edges that blend in easily.
It's been a very successful semester, and now is the time to register for the Spring semester. I need about 3 more people to sign up in order for the class to run. If you are interested in learning how to do silkscreen and how to print on fabric (or on paper too) visit http://www.fleisher.org/ to register ASAP. Time is running out! Spread the word!
Monday, March 19
Sunday, March 18
A long, long cloth
It's not too much to look at yet. Maybe only I can see its beauty right now... but I have begun stitching the collaborative wrapping cloth I'm making for the Philadelphia Cathedral in honor of All Saint's Day in the Fall. I've asked congregation members to bring me pieces of cloth that are meaningful or that have a story- perhaps they belong to a lost loved one, or a grown-up child, or a remnant of something worn and cherished, or a linen passed down through the family. So far I've received a white cotton sari, the arms and plackets cut off some linen shirts, a bit of patterned juvenile sheets, a scrap leftover from a child's brightly-colored shirt, and some other things. The 20-foot long cotton sari has been cut down into six 6 inch wide (by 20 feet long) pieces, giving me 120 feet of running background cloth to fill. As I tore it, I found a black hair woven into the fabric, which I'm pointing out in the photo below:
I've started off the first band in blacks and grays- very somber and stark. There are pieces of black shirt linen, dark gray tie silk (leftover from my tie portrait commission), light gray linen cross-stitched tablecloth, and some black and red 4-patch squares from my gran's stash. I'm just doing a raw-edge applique with running stitch striping over the 6-inch width to get the patches down. With 120 feet to fill I'll be doing this for a while. So far, 9 feet are appliqued, making one band of the 6 nearly halfway filled. Once the background cloth has been totally filled I'd like to go back to add text- a prayer for grieving whether over death or loss, and names perhaps. It will get a bound edge eventually.
When complete, this piece will be used to enfold the prayerful during the Prayers of the People for All Saint's Day, in honor of those who have passed out of our lives. It will start off with the stark blacks and grays, move through neutrals, then pastels, and finally into bright, vibrant colors to represent the grieving process.
I feel very honored to do this project, to be entrusted with the stories people attach to cloth, and to create something that will have a ceremonial function, not merely an aesthetic one.
Labels:
collaboration,
stitch,
studio
Saturday, March 17
Stitch and Surface Roundup Winter 2012
I had the pleasure of working with a wonderfully talented group of Stitch and Surface students this past 10 weeks of the Winter 2012 session at Fleisher. Thursday was our last class, and as usual, I asked students to bring back everything they worked on over the semester for a little critique. Here are some things form our design wall:
The sampler mandala project was a big hit. Starting with a button center, each new stitch learned became a new ring in the mandala. Every week over the semester I taught 2-3 new stitches. So they weren't complete until the last class.
Our second project coincided with Valentine's day. I provided a simple heart quilt block pattern to use as a base, but some students branched off into their own designs.
After an interlude of block printing with our home-made foam stamps, students launched into individual projects.
http://www.fleisher.org/ for registration.
| Catherine appliqued her mandala to a border pattern fabric and will complete it with a square of algerian eye. The cretan stitch used to applique is beautiful. |
| Ashante's became a spiral. I love the blue seeding behind the orange algerian eyes. |
| Quincy actually made 2! She may make more and start a quilt. |
| Ashante is an accomplished quilter, but shisha stitch and embroidery are inspiring new ideas. |
| Catharine successfully pieced, appliqued, and embellished a variety of commercial fabrics, and turned the skeleton characters into avatars for herself and her spouse. |
| Gerard started this text piece in a previous class, and added a screenprinted frame. This sparked a series of silkscreen frame/embroidered text pieces. |
http://www.fleisher.org/ for registration.
Labels:
stitch and surface
Saturday, March 10
What do hopscotch and abstract art have in common?
On Thursday afternoon before teaching class I happened upon an unusual sight. At first I saw what appeared to be a regular hopscotch board drawn in chalk on the sidewalk. But instead of a regular 1-10 hopscotch board, it stretched halfway down the block, and upon closer inspection I saw it was numbered from 1 up to 60!! I loved this glimpse of game creativity in the middle of the city block. Why not change a game to make it more interesting or last longer?! Why should hopscotch stop at 10? After a quick glance around to make sure nobody was watching, my inner 10 year old squealed in glee and I hopped down the block. So what does this have to do with abstract art? Well, the whole idea behind abstraction is that something is "Abstracted"- made less concrete or literal and removed from its original meaning or source. Perhaps, like the epic hopscotch board, and idea is pushed past its boundaries or altered from its original purpose.
On Friday night I went out to the "West Philly Abstraction" exhibit at the University City Arts League for the opening reception. It was, of course, great to meet and speak with some familiar artists, but equally great to see some intriguing work.
Marina Barker's stained glass pieces were an interesting contrast of order and sprawl. She shifts the attention of traditional stained glass from focusing on the color of the glass to exploring the line potential of the leading inbetween the panes. I like how the top piece seems like an exploded or mushroomed version of the lower one. (kind of like that huge hopscotch board!)
Tremain Smith had 2 pieces in the exhibit. I liked this one for its extreme complementary contrast. Tremain seems to be really pushing her color relationships lately- for a long time I remember her work having either analogous or pastel colors- much softer. This one vibrates in its intensity. I've been hearing the phrase "sacred geometry" a lot lately- Tremain certainly considers sacred geometry in her compositions, but these singing colors also touch that intuitively mathematical part of our brains that immediately recognizes pattern and balance.
Caroline Letham Santa had a large wall piece that pushed our perception of material and surface. It's almost a trompe l'oeil, tricking the casual observer into seeing a crumpled and flattened metal sheet. It's just a grey square mounted on a diagonal, right? Up close you can see how richly worked the surface is. The paper is creased, crumpled, torn, stained (purposeful? happy accidents?), and graphite is rubbed, drawn, erased to create a moonscape of texture on the surface. It's so subtle from afar, but it's one of those kinds of pieces that I could never tire of looking at and exploring.
If you have a chance to get out to University City, it's worth it. check out all the artists here. If you can't, then think about what you could abstract, push, transform, expand, or vibrate.
Wednesday, March 7
Accomplishments
This week has brought the culmination of so many different threads in my life. Tying knots so to speak. The shows are all up for Fiber Philadelphia, and the opening receptions were wonderfully attended. So months worth of exhibition prep have come to a close and a weight has been lifted.
For the past month I've been working on a commission piece with a group of students. I finally finished piecing and quilting all the elements they made and got it shipped out on Tuesday night.
The quilt is almost 3x4 feet and combines fabric marker-drawn and embroidered alphabet and text bordering a fabric-painted cityscape with appliqued motifs showing some Philly landmarks. When I undertook the commission I thought I was going to have a lot more time to work with the kids, but some unexpected half-day schedules in the school interrupted the process a bit. I like how bright and colorful it is, but I wish we'd had more time to push some of the elements further. The kids had fun, the teachers and principal of the school where I'm working loved it, and hopefully the organization that requested it is pleased. Getting it shipped off was another big relief this week, though.
The major, major accomplishment this week was the arrival of my Master's diploma! I can now officially say that I have a Master's degree in Art Education, and I have the paper to prove it! This brings the last 2 years of my life to a sweet closure. With the door of grad school closing I'm looking forward to the windows on my future opening. Let's see what they'll reveal....
Labels:
grad school,
kids classes,
news and notes
Saturday, March 3
Stitch Witchery opens Saturday, March 3rd from 6-9 pm! This great video shows the curator, Melissa, crocheting as always, and talking about the work.
Hope to see some old and new friends come out. Nichols Berg is on Germantown Ave in Chestnut Hill.
Labels:
news and notes,
video
Wednesday, February 29
The week before Fiber Philadelphia
I'm sure I'm not the only one who has been up till the wee hours putting all the finishing touches on pieces and hanging exhibitions this week. Fiber Philadelphia 2012 is officially opening this Friday, and galleries and exhibition spaces all over the city are featuring fiber artists from all over the country. It's amazing to be at the epicenter of the fiber world every other year.
So here's a little sneak peak at the behind the scenes of 2 of the shows I'm participating in this month. The second blog post I ever posted on this site back in May of 2009 has the beginnings of this piece:
Here are some shots of my installation piece for "Not a Stitch" at B Square gallery. It is a 2 ft wide by 12 foot long length of vellum which has been pricked with a traditional sampler border pattern in a large scale (see previous post for how this project developed). The thousands of tiny holes were pricked in order to pounce the pattern onto the walls of the gallery. Monday afternoon (after a full day of teaching and a weekend of little sleep no less) I arrived at the gallery to install and pounce. The curator left me a huge expanse of wall which I quickly set to work filling.
Much to my dismay, the paint-texture of the wall obscured my delicate pounce marks! Solution? A nice sharp pencil to trace around the pattern, drawing directly on the wall! It was really fun to draw on the wall and see the delicate pattern emerge. Installation took me about 3 hours! The pricked piece is hung in the center with the two pounced and traced patterns on either size. The grand scale and pattern give it a carpet-like feel.
This piece is impossible to photograph! Holes pricked in white paper and thin pencil lines on a cream wall! It can only be appreciated in person. So come on out to B Square gallery this Friday from 6-8.
For more info on Fiber Philadelphia check out all the listings. It's been great to see all my favorite bloggers posting about the biennial- I feel very hyped up about all the events, and it's nice to know I'm not the only one!!
So here's a little sneak peak at the behind the scenes of 2 of the shows I'm participating in this month. The second blog post I ever posted on this site back in May of 2009 has the beginnings of this piece:
I worked furiously on it through the summer of 2009 before beginning grad school at Tyler, and I finished all the elements for this image while in a graduate Projects in Fibers course that first semester. It is broken up into a map of the location where I took the source photo. However, grad school took over my life, and I never completed mounting the piece. I pulled it out to accompany the series of cityscapes I'm exhibiting at Nichols Berg Gallery in Chestnut Hill this month in a 4-person exhibit, "Stitch Witchery". I basted all the elements onto a backing of aida cloth, and then did a reverse applique in a rust-colored cotton to superimpose the map grid onto the image. I framed it Sunday to get it off to the gallery for installation. They are also showing my "Brick House" terra cotta and thread pieces and my other large cityscape that is broken up into a map grid as well. Poor art handlers! The opening is this Saturday March 3rd from 6-9.
Much to my dismay, the paint-texture of the wall obscured my delicate pounce marks! Solution? A nice sharp pencil to trace around the pattern, drawing directly on the wall! It was really fun to draw on the wall and see the delicate pattern emerge. Installation took me about 3 hours! The pricked piece is hung in the center with the two pounced and traced patterns on either size. The grand scale and pattern give it a carpet-like feel.
This piece is impossible to photograph! Holes pricked in white paper and thin pencil lines on a cream wall! It can only be appreciated in person. So come on out to B Square gallery this Friday from 6-8.
For more info on Fiber Philadelphia check out all the listings. It's been great to see all my favorite bloggers posting about the biennial- I feel very hyped up about all the events, and it's nice to know I'm not the only one!!
Labels:
news and notes,
studio
Saturday, February 25
Not a Stitch
Next week I'm installing a piece at B Square Gallery for the "Not a Stitch" exhibit which will open on Friday, March 2nd. I was very honored to be asked to participate as it's in one of my favorite galleries (run by a fellow Moore Alum!), and has an interesting international selection of artists involved.
But what does a fiber artist whose main occupation is STITCHING do that has NOT A STITCH in it!? My very first thought was to do something with pricked paper (I could at least use a needle that way), but wasn't sure what the imagery should be. Then I thought about printing an embroidery pattern:
This was a scan of an actual embroidery I did that I intended to screenprint onto fabric or paper as motifs or in repeat. However, I got a sneak peak at another artist's submission that was inspired by crocheted doilies, and then thought this one would be too similar and not nearly as interesting. So I hemmed and hawed some more.
The reason I wanted to do the sampler piece originally was because I often use this style of sampler in the classes I teach. It's an easy format where each new stitch becomes a ring in a mandala. Samplers are the traditional way for people to learn embroidery for the first time, and many people follow a pattern for where to place stitches.
I have a love/hate relationship with embroidery patterns. On the one hand, having a pattern encourages the novice stitcher to try a new medium and become proficient with the guarantee that the finished product will be satisfactory. Patterns introduce new stitchers into the world of embroidery, but they don't really encourage creativity. I've written about some of my embroidery research on this blog before, and can affirm that embroidery patterns have been around for centuries. Once printmaking presses were invented, commercially distributed patterns became widespread. Patterns such as the ones assembled below, published by Gilbers in 1527, can be seen in countless historic samplers.
From 1527 all the way into the early 1800's, these border patterns varied very little, showing how times haven't changed much in the DIY embroidery field. But I don't understand this widespread reliance on patterns. With some tracing or carbon paper one can turn any sketch, image, or photograph into an embroidery. When I teach, I try to encourage students to design their own images and experiment with fabrics and stitches to best interpret their ideas.
Sooo.... Not a Stitch, not a single stitch. These ideas of tradition and process and creativity have been bouncing around my head. Finally, it came to me to go back to that original idea of pricked paper-for that is a functional part of the embroidery process for transferring patterns to fabric. Our stitching ancestors didn't have our fancy fading marking pens and iron-on transfer paper or even carbon paper. Pricking and pouncing is a technique that has been used in many design fields for centuries to transfer images to another surface.
I decided to use one of the ubiquitous border patterns used in so many samplers in the past as inspiration for a pricked and pounced design. I enlarged this pattern from the original 2-inch high pattern to a 20 inch high design, making it larger than life. I used a pushpin instead of a needle to prick the pattern into vellum (it was easier on my fingers that way). When I install, I hope to pounce the pattern directly on the wall and hang the vellum on the wall, perhaps with the prickly backside turned towards the front to catch the light and emphasize the texture.
This has been an adventure, but it's really good to get pushed out of my comfort zone once in a while, and work my own creativity muscle.
Labels:
links,
news and notes,
studio
Wednesday, February 22
Exhibition Reception Coming Up!
This Thursday, February 23rd will be a coffee hour reception for my solo exhibit from 9:30-10:15 at the Speer Gallery of the Shipley School in Bryn Mawr, PA.
See the work up close and personal- for that is the best way to truly appreciate fiber art!
Labels:
news and notes
Sunday, February 19
Super week of printmaking on fabric!
Both my Stitch and Surface class and Silkscreen on Fabric class at Fleisher produced a huge quantity of printed fabrics this week.
My Silkscreeners got to be guinea pigs as I attempted to teach deconstructed dye printing. I was inspired by artist Dianne Koppisch Hricko to try this out. Last week I mixed up some sodium alginate, we added dye, and then painted or texturized the screens with dye paste. My crew really like image more than pattern, so they were more like monoprints, but one person attempted a repeat (above), while others just printed their images twice.
In the boat print above the left image was printed first and the right image was printed second after doing a flood stroke and letting the brown dye moisten a bit. In the tree image below, the right side was printed first, then the left. The beauty of deconstructed dye print is that the dye applied to the screen first and left to dry acts as a resist at first, but then as the dye moistens it breaks down and becomes printed as well. Some people went back in with some color to connect a repeat or unify an image.
Below is the screen after it was printed, showing only remnants of the "tree" painting that was on it at first. Another thing I LOVE about dye printing like this is that you can leave the dye in the screen to dry and still be able to wash it out- can't do that with pigment ink without ruining your screens!!! The only thing I'm concerned about is that my sodium alginate print paste mixture might be too thin, and our soda soaked fabric might not take the dye as well as I hope. We don't have a steamer, so we're batching the dye.
My stitch and surface class got to do their "surface design" technique this week. I brought in some weatherstripping adhesive foam and we created our own stamps with it.
Some people used wood blocks, others balsa wood rectangles, and others cardboard squares. Some people brought in adhesive backed craft foam to use as well, which allowed them to cut out motifs instead of just using the rectilinear weatherstripping.
We rolled fabric paint out onto plexiglass plates, then used the brayer to apply paint on the block. I hauled our fabric printing boards up from the silkscreen studio so we would have a soft surface to press into.
There was great experimentation with repeating and overlapping:
Some people explored color shifts and printing over pre-existing patterns:
The metallic fabric paints look fabulous:
Once block-printing was finished, a few students even tried out monoprinting by placing strings over the rolled out inks on the plexi plates:
I loved introducing my students to all these easy printmaking techniques. You can do so much with very little equipment or supplies. As I have some teachers in the group, I hope they'll be inspired to try these out with kids as well. (Well, maybe not the dye stuff, but definitely the block printing!!)
PS: my birthday was this week, and to have this much fabulousness going on in my classrooms was a great present!
Labels:
dyeing,
printmaking,
silkscreen,
stitch and surface
Subscribe to:
Posts (Atom)


