My first exhibit of this year will be at Fleisher Art Memorial- we're having a printmaker invitational exhibition to coincide with the annual "Love-in"- a Valentine-making print workshop that's open to the public. The artists include Fleisher's print faculty (I teach silkscreen to adults and children), and artists who have donated images for the Love-in in past years. The exhibition runs January 14 – March 10, 2012 and the reception will be Friday, February 17, 5:30 – 7:30 pm (my birthday!!).

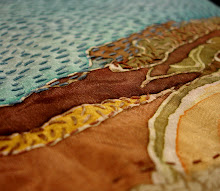
This piece started off as an experiment in 4-color process printing. I was trying for a format and effect that might suggest the "instagram" photo look. Unfortunately, the cyan balance was a bit off and I wasn't totally happy with the results. So what do you with "unsuccessful" prints? Alter them!! I started off by stitching into one print with some pale yellow-green straight stitches to suggest grass in the empty lot, and then went wild with feather stitch in the foreground foliage. It wasn't quite working though, so I made a bold move! I cut the middle- and back-ground out of my print, and grabbed 2 more prints from my edition. A print for the middleground got a new smattering of grassy stitches as well as some blue-green fly stitches, and the background was cut away. Finally in the background layer print I outlined the mural framing with some long floats (I would never have such long floats on a fabric embroidery, but it works on paper). Finally, I bought some double-side adhesive foam squares so that the 3 layers could be assembled for a 3-D effect. Photographs don't really do this piece justice, so you'll just have to come out to Fleisher's Works on Paper Building at 705 Catharine St. starting January 14th.
PS: the trick to stitching on paper is to pre-pierce your holes. It also works better on thicker paper!

This is gorgeous. I love altering prints and it's great for students when they are unhappy with their print results. Nice work!
ReplyDeleteThe 3-D trick is great too, especially if you want to teach background, middleground, foreground very concretely.
ReplyDelete