But what does a fiber artist whose main occupation is STITCHING do that has NOT A STITCH in it!? My very first thought was to do something with pricked paper (I could at least use a needle that way), but wasn't sure what the imagery should be. Then I thought about printing an embroidery pattern:

This was a scan of an actual embroidery I did that I intended to screenprint onto fabric or paper as motifs or in repeat. However, I got a sneak peak at another artist's submission that was inspired by crocheted doilies, and then thought this one would be too similar and not nearly as interesting. So I hemmed and hawed some more.
The reason I wanted to do the sampler piece originally was because I often use this style of sampler in the classes I teach. It's an easy format where each new stitch becomes a ring in a mandala. Samplers are the traditional way for people to learn embroidery for the first time, and many people follow a pattern for where to place stitches.
I have a love/hate relationship with embroidery patterns. On the one hand, having a pattern encourages the novice stitcher to try a new medium and become proficient with the guarantee that the finished product will be satisfactory. Patterns introduce new stitchers into the world of embroidery, but they don't really encourage creativity. I've written about some of my embroidery research on this blog before, and can affirm that embroidery patterns have been around for centuries. Once printmaking presses were invented, commercially distributed patterns became widespread. Patterns such as the ones assembled below, published by Gilbers in 1527, can be seen in countless historic samplers.

From 1527 all the way into the early 1800's, these border patterns varied very little, showing how times haven't changed much in the DIY embroidery field. But I don't understand this widespread reliance on patterns. With some tracing or carbon paper one can turn any sketch, image, or photograph into an embroidery. When I teach, I try to encourage students to design their own images and experiment with fabrics and stitches to best interpret their ideas.
Sooo.... Not a Stitch, not a single stitch. These ideas of tradition and process and creativity have been bouncing around my head. Finally, it came to me to go back to that original idea of pricked paper-for that is a functional part of the embroidery process for transferring patterns to fabric. Our stitching ancestors didn't have our fancy fading marking pens and iron-on transfer paper or even carbon paper. Pricking and pouncing is a technique that has been used in many design fields for centuries to transfer images to another surface.

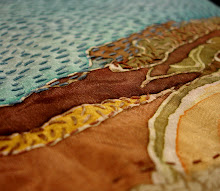
I decided to use one of the ubiquitous border patterns used in so many samplers in the past as inspiration for a pricked and pounced design. I enlarged this pattern from the original 2-inch high pattern to a 20 inch high design, making it larger than life. I used a pushpin instead of a needle to prick the pattern into vellum (it was easier on my fingers that way). When I install, I hope to pounce the pattern directly on the wall and hang the vellum on the wall, perhaps with the prickly backside turned towards the front to catch the light and emphasize the texture.
This has been an adventure, but it's really good to get pushed out of my comfort zone once in a while, and work my own creativity muscle.

No comments:
Post a Comment