Pages

Saturday, August 27

How I spent my summer vacation

 Summer vacation? Nope! I've spent the last few weeks of my summer running an arts camp in Northern Liberties, Philadelphia out of the community center. We've had about 50 kids each week. During the first week I helped the kids create sets and props for their Friday performance. This week I helped run a puppet class, but both weeks I was in charge of organizing the teachers and kids and keeping things running smoothly. The teachers came up with the projects they wanted to do with the kids, so I can't really take any credit for the resulting work here, other than perhaps helping to brainstorm options with the teachers. I was really happy with how that worked out this year- instead of planning every little project myself, this delegation gave the teachers more ownership and autonomy in the lessons. I had a great staff to work with, and they created fun art experiences for our kids. We gave the kids a lot of choice as well- they were able to select 2 out of 4 options for arts activities in the morning, and 2 out of 6 options for afternoon play activities.
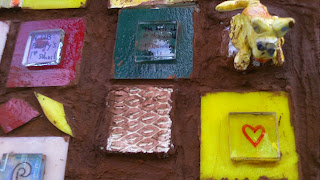
The mosaic above and below was created by our 11-13 year old "junior counselors". They worked on an art project in the morning, played "reporters" to document the week of camp, and helped out with the kids in the afternoons. For their mosaic they used tiles and sculptures that never got picked up after our wintercamp activities last December. Their mosaic creates a frame for us to post signs or pictures in the future and it brightens up a very dull wall to greet passersby.
 We invited artist Matt Leines to do some jointed puppet-making with the kids. They are almost life-size characters that use brads to connect the limbs.
 The kids started by brainstorming character types, animals, and emotions. They then created their own characters combining several ideas together. Our younger group was very inspired by existing cartoon characters, but the older kids were very inventive.
 Our painting elective teacher, Natasha, had the kids do self-portraits in watercolor, a background/environment painting in tempera, and a large collaborative mural.
 The 5 and 6 year olds were learning a lot of different printmaking techniques. They did fingerprint characters, cardboard shape printing, and cut paper stencil printing, which were all combined in a group mural.
 Our sculpture elective teacher, Kelly, had the kids do air-dry clay realistic objects, and some found object sculptures as well. My favorite one was this "laptop computer" straight from the stone age.
 In action art, the kids made paintings with balls, toy cars, and toothbrushes as painting tools in Pollock-inspired pieces, mobiles with cut paper shapes, chalk drawing on the wall following music prompts, and a zen garden in our gravel-filled yard.
It's been a busy 2 weeks of art-making with kids. The schedule makes me commiserate with school teachers getting back into the swing of things. Hopefully it helps the kids get back into a school frame of mind too.
One more week left- we're supposed to be taking lots of trips. Right now we're waiting out a hurricane.

Sunday, August 21

Softie roundup!

For the past 6 weeks I've been teaching a softies class at Fleisher for adults. Here's a glimpse of some of the creations my students came up with. We had 3 main projects: a set of "building blocks" of simple shapes to help teach some pattern and sewing skills and spark the imagination; a simple silhouette 2-sided piece with painted or stitched embellishment, and a final multi-limbed piece. 
 I posted my porcupine and floppy kitties before, and here are the last 2 sample pieces I made for the class. The gray kitty was a more sculptural/tailored piece, unlike the very simple shapes of my previous kitties. Unfortunately his back paws were angled wrong and he didn't stand up the way I wanted. Back to the drawing board. But it was nice to have a piece that required some adjustments, as it offered an opportunity to show how to fix some construction mistakes. The puppy was a quick handsewn felt sample I made in order to demonstrate a button joint. His 4 legs rotate very nicely. It was great to get to make a few softies and take a time out from my everyday studio work- I'm not going into business any time soon, but they're an awful lot of fun to make.
 These are a collection of dolls one of my students created. She started off hesitantly with a simple pattern she found online (the red-dressed one on the left), but then went to town finding patterns and making all different kinds of dolls. She mastered hair and clothes, and expressions. I think she prefers machine sewing over hand-sewing, but she really got a lot done that way!
 I had another prolific student who took each of the projects and expanded them with her imagination and creativity. She made all of her pieces in a nice fleece fabric, that was so soft and cuddly it makes these true "softies". These were mostly handsewn. The doll and frog both have button joints and are very poseable. The bird required some pipe cleaner mechanics to make it stand independently.
The sweetest piece was this little, handsewn felt and corduroy bear made for a new preschooler to be his nap-time buddy.
I hope my students enjoyed the class, and feel confident in their ability to transform their imagination into their own pattern pieces. It seems like they're off to a good start.

I'm on a little break from Fleisher for a few weeks until the Fall semester begins. If you're interested in Fall classes it's not too late to sign up! I'm teaching Color theory and Stitch and Surface for adults, an after school basic design class for 11-13 year olds on Wednesdays, and a fiber class and silkscreen for 11-13 year olds in the free Saturday kids program. Spread the word!

Monday, August 15

Stitch and Surface intensive

Last week I spent every day from 10-1 at Fleisher teaching the week-long Stitch and Surface intensive to 12 fabulous ladies. For the week I had a theme of photography as inspiration, but it branched out a bit and we squeezed a LOT of stuff into 15 hours of work over 5 days. We made:
  • a doodle-inspired sampler to see how drawing marks and stitch marks correlate
  • a cyanotype on fabric
  • a shibori-dyed piece of fabric
  • a handbound book to hold our handouts and sketches
  • a final project utilizing our cyanotype fabric or something else
 Kathleena used lace as a negative, stitched the outline of the shapes in orange double running stitch, added a dancer copper pin, a gold shisha mirror, and a beaded fringe eventually it will have a backing fabric like a banner and some more stitches and objects. It was a very experimental piece without too much pre-planning. Sometimes allowing your creativity to flow out can lead to great things. You just have to be open to it.
 Bonnie had a beautiful photograph to work from of a seascape looking down along a cliff. It felt Irish or Northern Californian. She created a hand-drawn negative on mylar, and added lace at the top for a combination print. Then used a very painterly approach to her stitches for color and texture.
 Donnetta had a lovely book of Vermeer paintings and created a hand-drawn negative on mylar for her "Girl with a Pearl Earring". She then took another painterly approach using satin stitches for the planes of the face and head scarf. A lace frame in the cyanotype contact print completes the composition.
 Ellen had a book of botanical photographs in black and white. She photocopied a page and cut a paper stencil for her negative. It created a bold silhouette for her cyanotype which she then filled in with satin stitch, fly stitches, and backstitch with an eye for light and shadow in color.
 Kathryn had an acetate negative of a forest mountainscape for her cyanotype. She then created a scrapbook-like foreground frame in fabric collage for color, and stitched a trompe l'oeil twig below the photo. She'll add more detail into the cyanotype, but it's a very soft-looking memory image now.
 Julie announced at the beginning of class that she didn't like to hand-sew! But she ended up with  a lot of embroidery after all. Her inspiration was a magazine fashion photo. She did make a hand-drawn mylar cyanotype print, but ended up scanning the photo and digitally printing it on fabric to add to the fabric collage. She used a lot of fusible web to applique the fabrics, but will add more stitches and embellishments later. I love all the color and pattern in this one, and the experimental way she went about building her image.
 Nicole tried out the cyanotype, but for her final project did a straight embroidered image. This abstract-looking composition is actually a reproduction of a microscope view of liver cells. It fits so perfectly inside the hoop, I told her she should use the hoop as a frame like many DIY embroiderers are doing.
This last project was done by Mary Elizabeth Nelson, who teaches the book arts class at Fleisher. She had a real goal to learn as many stitches as possible, and explored each one in a series of sampler composition pages. It took some problem-solving to think about how to do each stitch on paper instead of fabric, since in paper you need to prick your holes prior to stitching, and too many holes can cause perforation and tearing (no satin stitch!). She ended up with 4 complete sampler pages which she bound together with vellum covers and interleaves between the pages.

What a productive week! And what creativity and individuality! I've probably said this lots of times before, but I feel like I've done a good job if everyone's voice shines through the projects, and they don't all look the same. Now I've got to come up with something new and wonderful for the Fall session!!

Sunday, August 14

A bold black line

I've been stitching up a storm over here ever since I was informed of an exhibition opportunity for February. I'll be having a solo show at the Shipley School's gallery, and I want to have new work for the show. My past 2 years of grad school have been more focused on education than studio work, and the studio classes have projects that aren't always related to my preferred focus of medium or subject matter.

So to that end, I've begun at least 2 new pieces- both long, narrow cloths. One will be a vertical river-like strip, and this one will be a horizontal panorama. I've been quite enamored by a spool of black tatting-weight thread lately, and have been enjoying drawing with it on cloth.
 This skewed view is a night's worth of whipped backstitch to draw the Ben Franklin bridge and Camden waterfront onto some red silk I cut off my wall piece. The whole piece will be about 3 ft long and only 4 inches wide. I pieced together the panorama from various screen shots from Google street view, traced it onto vellum as a pattern, but forgot my transfer paper, so have been free-handing it. I really like line drawing in thread, and a whipped backstitch makes such a lovely line.
For the past week I've been teaching a morning intensive Stitch and Surface class, and the black thread was brilliant on this yellow arashi linen. This is my demonstration sampler which built up as I showed students individual stitches. The bits of color are either Shisha embroidery or reverse applique pieces. I love, love, love reverse applique....
The spool of black thread is nearly exhausted. I'm going to have to run out for more soon. I wonder sometimes how many miles of thread I've stitched in my lifetime...

Thursday, August 4

Itajime results

My shibori students at Fleisher were wowed by the results of their itajime/clamp resist shibori dye experiments. Clamp dyeing definitely gives dramatic and graphic results compared to the more organic tie dyeing and pole wrapping we've done so far. We also added in the fun of overdyeing some commercially printed fabrics from the scrap pile.
 The center one above reminded us of skyscraper windows at night- it had been extensively pleated and clamped with binder clips.
 The long piece at right  above was clamped with wooden blocks, one of the largest shape sets we had, and gave a very bold butterfly effect
 I really loved the snowflake results above left- showing that the wood cutout aisle at AC Moore can yield some interesting resists.
 The red and blue pieces above both used a variety of plexiglass shapes and interesting folds for great variety and repetition.
 This blue piece was really the most incredible! I'm wondering if anyone can guess what was used as a resist....
 On Monday night we also revealed our sun-fade shibori. On the second night we had taken pieces of very dark solid-dyed fabric pieces out to the parking lot and bound them with tape resists, cardboard shape resist, and thread to various poles in very sunny spots. The hope was that if we left them long enough, the sun would fade the exposed areas. We probably should have left them one more week, but there was still some subtle fading occurring on the pieces. Enough to prove the experiment worked!
There's only 2 more weeks left. I'm hoping my students will put together some interesting final projects with the fabrics they've created. I really love dyeing fabric. It's an indulgence to get to teach this class and do some more myself.

Monday, August 1

Some more softie fun

The great part about teaching a class sometimes is that I get the fun of making samples. The Softies class for adults at Fleisher is halfway finished, and I've been able to make a few myself to demonstrate specific skills. Below is a porcupine softie. He was made by drawing a pattern, tracing and flipping onto white broadcloth, using black fabric paint to create detail and texture, and then cutting out, sewing, and stuffing. He was a sample piece for the idea of a 2D silhouette shape becoming a 3D object when stuffed.
 For my porcupine I actually asked on facebook for ideas from my friends what animal I should make. The person who responded is getting to keep this one.
 My 2 kitty cats are sort of a sample piece. I'm going to use them to show how to make a more complex and multi-limbed construction. The ears, tail, and legs have to be sewn and stuffed before being inserted into the head and body pieces, and then the head and body are stuffed and joined together with a blind stitch.
I made these two for my niece's twins, because they got so excited by my student's cat softies I'd also posted on facebook. There's a calico cat which reminds me of my mother's cat, Putter, and a tuxedo/musical cat which is a lot like my own cat Jolie. They're an awful lot of fun to play with as a pair, especially when someone discovers a mouse finger puppet in my sewing nook, and ends up playing cat and mouse and laughing with me all night.
Adults shouldn't forget how to play- it's important to play with your kids, and the ability to play is a key component to artistic and creative thinking!