Pages

Wednesday, June 29

Reflection

I played with the Thinker image, mirroring it, because that’s what I’m thinking about right now. The resulting image is even kind of brain-like! I'm working on writing my thesis, which will be a story of Reflective Practice, which to me means thinking about what you do, visualizing it, interpreting it, critiquing it, in order to improve your practice. By documenting what you do and how you think you can become the observer and not just the subject, take a step away from what you do in order to analyze it. By putting it on a blog and sharing with a wider public you create an opportunity to hear criticism, praise, commiseration, and suggestions for an additional outside observer to confirm or deny your perceptions. This also expands your community of practice from the narrow level of fellow teachers in your school, district, or acquaintance to a community that includes the nation and even the globe. Art teachers are often in the minority within a school, and need to find other ways to discover a community of other art teachers. Artists are often isolated in the studio and need to open up to a wider community to share with.
As an artist I think it's great to make art or sketches that document my thinking process as well. Visual Thinking. It's even a newfound research method to document the development of the researcher's ideas. This mirrored image took me less than 2 minutes to make in my laptop's Paint program. It's taken me longer than that to write this description. I wish I could just make a thesis of images and not 50 pages of words!

Saturday, June 25

Picking things up again

I was trying to figure out what work I should put into the annual Fleisher faculty show this year, and decided I REALLY wanted to try to finish my wall piece. This was started over a year ago for a final project in a surface design class I took at Tyler. It never got finished, because... well it's humongous for an embroidery. It's probably more of an art quilt than an embroidery. I hate having "U.F.O's" hanging around, so it will be a huge load off of my artistic subconscious to have this piece completed.
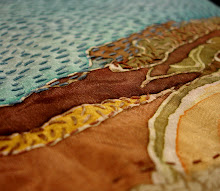
 Above is part of the front and below is the back side. It's mostly silk, and it feels so wonderful between my fingers and draped over my lap as I work.
 Below is  little sample sketch piece I did when I started the project.
The final one is nearly complete now. The red and cream areas are finished. The blue has begun. I'm doing a large scale whipped lattice work over the blue section, but I think I'm going to crop the piece a bit to narrow the blue. Then I'll bind it and have a velcro strip attached on the back side for mounting.

Working with the dyed silk is making my fingers very itchy to start m shibori dyeing class this summer. It's running but still has some room. It will be a 6 week course incorporating various shibori dyeing techniques, an embroidery stitch sampler, and a final embroidery or quilt piece to incorporate the dyed fabrics. Monday nights through July and August! I'm also offering a soft sculpture course on Wednesday nights, but need more students for it to run. Sign up at Fleisher's website! Classes start July 11th!

Monday, June 13

RIP FiberArts Magazine

I am so so sad. I received my VERY LAST issue of FiberArts magazine in the mail today with a notice that they will no longer be publishing the most wonderful magazine ever. I've subscribed to FiberArts for over a decade and it has been highly influential to me as an emerging fiber artist. I even had a letter to the editor published in it once. I never got around to submitting my own work to them for publication and I seriously regret not being brave enough to do so before now.
Goodbye FiberArts. This is a blow to my genre of Craft.

Graphic Tee collaboration

This past semester at Fleisher, I teamed up with Liz Latham who teaches the teen Digital Photography course on Saturdays upstairs from where the screenprinting studio is. We arranged for our students to collaborate as designers and production team to create 2 layer graphic Tshirts. Her students took photos and manipulated their images in photoshop to make them bolder and more contrasted for print. My students designed background symbol layers to print in color. It was an interesting process of brainstorming, voting, and working together. I burned the screens with the teens' designs on Thursday and we were able to finish all the printing on Saturday.
 The images were mixed and matched, and the images turned out quite interesting depending on which symbol they were printed on.

 The meerkats and graffiti over the happy face is my favorite. In fact, I went and bought a Tshirt for myself today so I can print the graffiti one. (The great benefit to photo screens over paper stencils- the image can be reprinted easily!)
Of course the one drawback to photo screens is the extra prep time I spend coating, exposing, and then after printing having to reclaim them. Ah well- definitely worth it this time! These are the best T-Shirts I've seen my young screenprinters make yet!  Collaboration is key. Talking them through symbolic imagery was extremely helpful. Democracy in action in my classroom studio! Can't wait for our next session. I have 2 morning screenprinting camps being offered in July at Fleisher. One is for 11-13 year olds and the other for 14-18 year olds.  Go sign your kids up!

Sunday, June 12

My pint-sized screenprinters

After 2 weeks of no class due to Memorial day and an art streetfair, we finally got back into the screenprinting studio with my 11-13 year olds this afternoon. I'll post what we worked on today in a separate post. Today I wanted to show the final results of their multi-layer collaborative prints, which were turned into individual collages.
 Students were encouraged to "Break the Rectangle". They were allowed to choose  whatever size base paper they wanted, so some are only about 10 inches across, and one is at least 2 ft across.
 They were reminded about geometric vs. organic shapes and encouraged to use arrangement of color as a way to organize composition and to consider the connection and movement of lines to direct the eyes around their image.
 We discussed abstraction and the difference between representational and non-representational imagery.
 The kids were a little unhappy with edges popping up due to insufficient gluing, so we coated their final images with gloss medium. It makes them very object-like I believe.
 We had fun naming what we "saw" in their abstract images. The one above reminds me of a mother and child, and the one below is boat-like with its red prow and stern and black sails.
 Through this project students learned all about the screenprinting process and various ways to block screens to create an image. We learned a LOT about the Elements and Principles of Design. Most importantly, students learned to collaborate in the process.
 But after all that collaboration I was very glad to give them a chance to make something all their own. We did not use printmaking so much for making multiples in this case, but for generating a wide range of source material for our collages by layering over different prints each time.
I love how varied their shapes are as a result of this printing and collage process. I think kids this age tend to rely on symbolic shapes like hearts and peace signs, but they really pushed themselves to make something new and all their own.

This semester concludes one whole year of teaching screenprinting to kids at Fleisher. I've evolved in the process, and it keeps getting better and better. It's truly been a great semester in the studio with my teenybopper screenprinters!

Sunday, June 5

New work

 While chained to my sewing machine last week making the pillows for the 5th graders I took some time out and stitched together a new background piece. I've still got lots of pieces from my gran's old stash and now have two more compositions stitched up. This one is a 9 patch arrangement of her 16 patch assemblies. There's a shift from greens into blacks/tans/blues. Staring at it on my inspiration board I decided the colors were representing city girl (me) and farm girl (her). It's basted to sandwich it to a piece of soft white recycled sheet cotton on the back. I've started some sashiko stitching over the "city" portion in a grid pattern. I'm thinking interlocking circles over the greens.
Here's a blurry pic of my gran from a snapshot that fell out of a book my mother gave my daughter yesterday. It was taken in 1949. I wonder what she would think of my quilt appropriations...